
How can we help?

[{id=191604258404, createdAt=1750439292477, updatedAt=1781736280196, path='do-s-and-don-ts-of-quickbooks', name='Do's and Don'ts of Quickbooks', 32='{type=number, value=2}', 2='{type=string, value=http://rainpos.my.site.com/s/article/Do-s-and-Don-ts-of-Quickbooks}', 4='{type=list, value=[{id=1, name='rain_pos', order=0, label='Rain POS'}, {id=2, name='like_sew', order=1, label='Like Sew'}, {id=3, name='jewel360', order=2, label='Jewel360'}, {id=4, name='music_shop_360', order=3, label='Music Shop 360'}]}', 6='{type=string, value=
QuickBooks Desktop for Windows is the only supported option right now.
We also integrate with Quickbooks Online, but for the QB Desktop integration, we do not integrate with the version for Mac at this time (this is because the Intuit QB Connector app does not support Mac).
How to Set Up Your QuickBooks Connector Step One: Sales Taxes.
We DO Export
- Transaction Data (Sales Receipts, Accounts Receivable, Taxes, Shipping, Gift Cards, etc)
- Cost of Goods Sold (we DO support splitting COGS by departments)
- Income (currently lumped together as a single total)
- Vendor Bills (we only do this for Completed ROs)
We DON'T Export
- Full Inventory Value or Product Inventory Edits
- Customers (no individualized data by customer name, everything is lumped under one customer record)
- Accounts Receivable Edits (we only export when it deals with a transaction, not customer profile edits)
}', 39='{type=number, value=1}', 40='{type=number, value=0}', 9='{type=string, value=Do's and Don'ts of Quickbooks}', 22='{type=option, value={id=3, name='faq', order=2, label='FAQ'}}', 23='{type=list, value=[{id=3, name='faq', order=2, label='FAQ'}]}', 24='{type=list, value=[{id=87, name='integrations', order=86, label='Integrations'}]}', 25='{type=number, value=0}', 26='{type=list, value=[{id=190209692545, name='Settings'}]}', 28='{type=string, value=Do's and Don'ts of Quickbooks QuickBooks Desktop for Windows is the only supported option right now. We also integrate with Quickbooks Online, but for the QB Desktop integration, we do not integrate with the version for Mac at this time (this is because the Intuit QB Connector app does not support Mac). How to Set Up Your QuickBooks Connector Step One: Sales Taxes. We DO Export - Transaction Data (Sales Receipts, Accounts Receivable, Taxes, Shipping, Gift Cards, etc) - Cost of Goods Sold (we DO support splitting COGS by departments) - Income (currently lumped together as a single total) - Vendor Bills (we only do this for Completed ROs) We DON'T Export - Full Inventory Value or Product Inventory Edits - Customers (no individualized data by customer name, everything is lumped under one customer record) - Accounts Receivable Edits (we only export when it deals with a transaction, not customer profile edits) Settings integrations}', 31='{type=number, value=1}'}, {id=191604258410, createdAt=1750439292483, updatedAt=1791310574464, path='getting-to-know-the-system', name='Getting to Know the System', 32='{type=number, value=0}', 2='{type=string, value=http://rainpos.my.site.com/s/article/Getting-to-Know-the-System}', 4='{type=list, value=[{id=1, name='rain_pos', order=0, label='Rain POS'}, {id=2, name='like_sew', order=1, label='Like Sew'}, {id=3, name='jewel360', order=2, label='Jewel360'}, {id=4, name='music_shop_360', order=3, label='Music Shop 360'}]}', 37='{type=number, value=2}', 6='{type=string, value=
Congratulations, you are using the best system for integrated website and point of sale!

To begin using the system after you have logged in, please take a look at the following resources that are available to you:
The Admin Tools
This is the heart of the system, and you can access all of the functions and features of the system from the menus and buttons here. The buttons down the left side are the major modules, data tools, and reports of the system. Across the top are some useful utilities such as the system search, configuration and settings tools, Support, and some administrative functions such as the Time Clock.
System Home
The system Home page shown above is what you'll see whenever you log into the system, and has some useful features for you. You can get back to this page from anywhere by clicking the System Logo in the upper left corner.
- On the right you'll see the System Updates from the previous week, listing New features, Improved areas of the system, and bugs and glitches that we have Fixed.
- Need Assistance? On the left you'll see info on how to contact Support if you have something to report or a question on how to use the system. The more details you can provide, the better!
- Below the support area is a Suggest button you can use to tell us your ideas for how we can make the system work better for you. We review your Insights daily and the ones with the most votes are the ones we work on first, so get in and let us know which improvement are the ones that will be the most impactful for you.
Favorites
You are able to set parts of the system you frequently use to appear in this convenient menu, accessible in the upper left from anywhere in the system. When you hover your cursor over the Favorites button, you'll see any you've saved in the flyout menu.
- Modules and Tools - Different major parts of the system, such as the main Products list page or the Work Orders module, can be saved as Favorites and will appear in the list on the left.
- Reports - For the reports you use most, you can get to them with a single click by saving them as Favorites, and they will appear in the list on the right side of the flyout menu.
- Custom Reports - Some reports, such as the Sales Details report, allow you to configure custom views that you can easily load again and that update over time. Any of those you've saved will appear below the list of standard reports on the right.
- Save Your Favorites - Click either one of the Manage links to load the Favorites page, where you'll be able to click Star buttons for the features and reports you want in your Favorites menu.
Register
Our on-screen Register module will allow you to sell your in-store items, and has a wealth of features detailed fully here (this link will open in a new browser tab for you). When you open the app, you'll be asked to choose a Till, and you may need to enter a Register PIN code. Once you're all set you can start your first transaction, like the one below.
Orders
You can work with Website Orders that have come through in the Orders area on the left. This tool allows you to fulfill your web orders, refund them, mark them as shipped, and print out orders as needed.
Inventory
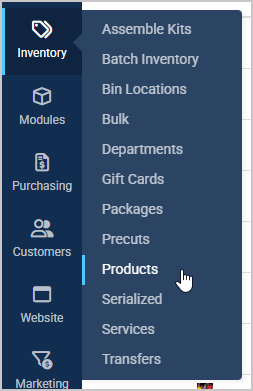
If you hover over the Inventory area on the left, you'll see a flyout menu of many useful tools.
- Assemble Kits - You can use the Assemble Kits module to combine multiple products into a single bundled product.
- Batch Inventory - The Batch Inventory module allows you to collect quantity information and add it to the tool in batches that accumulate quantities so you can update your actual on-hand inventory numbers.
- Bin Locations - If you want to define Bin Locations throughout your store, you can do so here and those will be available when creating products so you can assign them to whatever bin is appropriate.
- Bulk - You can manage your products and inventory by spreadsheet in the Bulk area.
- Departments - You can add or edit the Departments you use for organizing and reporting on your products.
- Gift Cards - You can work with your Gift Cards (usable both online and in the Register), create any you might need for store use, and view a log of Gift Card events, if needed.
- Packages - The Packages module will give you the ability to offer different combinations of products as package deals at a single combo price.
- Precuts - You can use the Precuts module to break a product up into multiple products (e.g. you can create 4 quarter-yard Fat Quarters from a yard of fabric).
- Products - In the Products area, you can create a New Product, access a searchable and filterable list of your Products, and do on-screen bulk edits, exports and imports to spreadsheets and purchase orders, label prints, and deletions, if needed.
- Serialized - The Serialized inventory tool will let you adjust or add serial numbers to serialized inventory you sell.
- Services - You can work with your Services you use in Work Orders, adding new ones and configuring them as needed.
- Stones (not pictured) - This module allows you to work with your stock of Stones by cut, weight, type, etc. if you work with and sell precious stones.
- Transfers - If you have multiple locations, you can do Transfers of inventory as needed between locations.
Modules
The Modules menu on the left will give you access to some important parts of the system:
- Appraisals - Your Appraisals are available from here, and you can create new ones as needed.
- Classes - You can access your Classes from here, and you can create and schedule them as needed.
- Consignment - If you do Consignment selling, you can access your contracts and work with payouts here.
- Form Styles - If you need to print documents at letter size, the Form Styles module allows you to configure unique receipts, invoices, work orders, etc. for each of your Locations.
- Gift Registry - If you have Gift Registry active on your website, you are able to work with those lists here.
- Invoices - For your Invoices, you can view the list and work with any of them in this area.
- Layaway - The Layaways module lists your open Layaway agreements and you can open and work with them from there.
- Live Selling - The Live Selling feature allows you to use social media in live events that can be a successful way to sell items.
- Loaner - If you do Work Orders, you may want to keep track of any Loaner items you have out, and this module allows you to do so.
- Online School Rentals - You can manage and work with your school rental contracts in the Online School Rentals module.
- Payment Plans - If you offer Payment Plans for store-financed purchases, you can track and work with those agreements here.
- Quotes - You can see the active list of saved Quotes in the system by clicking that link, and those are all saved directly in the Register.
- Rental Contracts - You can see and work with open Rental Contracts if that part of the system is active for you.
- Restricted Items - If you need to limit access to some of your inventory, you can configure that in the Restricted Items module.
- Short Term Rentals - Your Short Term Rental functions are also here for you, allowing you to look up the Rental Status of any active Rental, view your Rental Calendar, and configure the system how you need it to work in the Rental Admin area.
- Special Orders - The Special Orders page shows a list of all active Special Orders you've created from the Register, allowing you to open and work with them as needed.
- Subscriptions - If you wish to do periodical Subscription sales, you can set that up in this area.
- Trial Purchases - For some items, customers will want to do Trial Purchases to make sure the item will work for their preferences.
- Work Orders - In the Work Orders module you can track and bill for any labor-based work, such as repairs.
Purchasing
The Purchasing section lets you work with all of your inventory ordering activities:
- Customer Purchase Orders - If your store is a 'vendor' for organizations that purchase over time throughout a fiscal period from a budget, the Customer Purchase Orders module will allow you to facilitate those purchases, for products and for work orders, and invoice the client as needed.
- Purchase Orders - You can access and work with your inventory orders from your vendors in the Purchase Orders module, creating new orders as needed.
- Receiving Orders - You can use the Receiving Orders module to work with your list of orders, and you can create new ones out of PO's made in this system or from scratch if you've already sent in an order.
- Vendor Consignment - If you do consignment selling with any of your vendors, you are able to track that and manage it through the Vendor Consignment module.
- Vendor Return - When inventory arrives in an unsellable condition, or for whatever reason might come up, you are able to use the Vendor Return module to handle that inventory reduction in the system.
- Vendors - Important contact information and a history of your vendor orders are available to you in your main Vendors list page. You can also start new inventory orders for a vendor when viewing their card from this list.
Customers
The system has excellent resources for working with your customers, from the main Customers list page where you can view one customer at a time, or bulk features and tools for groups and mailing lists in the Customer Filters area. Here are your options:
- Customer Groups - If you have groups of customers with whom you need to work and communicate in different ways, such as club members or top customers, the Customer Groups module allows you to make as many groups as you need. You are able to add any number of your customers to a group and email to that group as often as you like.
- Customers - Every website customer that orders from you and every Register customer for whom you create a customer entry will be listed on this page, with full details accessible and bulk features available if needed.
- Filter Customers - If you like the idea of building marketing email lists based on the shopping history of your customers, this module allows you to do so and create as many filtered lists as you might need.
- Tailored Product Lists - If you're working on a consultative sale that might take a few visits to close, the Tailored Lists area can allow you to save lists of such items for individual customers so you can track how it's going.
Website
Our website CMS (Content Management System) has robust tools for you to easily add and update the content you need. Here are your options:
- Calendar - Our website Calendar allows you to schedule and display information on one-time or recurring events, and can be customized for specific areas, such as your individual locations or by topic, such as a calendar listing only your classes.
- Categories - You can organize your products for display on the website using the Categories module. You can add sub-categories that go down any number of levels you might need.
- Files - Our Files tool allows you to manage any files needed in the system, including documents such as PDF file, general files such as audio or video or executable files you might want to sell through your website, or the different images you use throughout the system.
- Forms - You are able to create and publish website Forms in this module, and you can view responses and form submissions in bulk from here.
- Navigation - You can create as many website Navigation menu links to pages and resources as you need and organize them into drop-lists under your header items in the main menu.
- News - Let the world know about what's going on with your organization using the News module to post updates to your website as often as you like.
- Pages - Create individual website Pages and manage their publication here. If you have a lot of pages, you can organize them in folders to make them easier to find and edit.
- Store Locator - This tool is great for multi-location stores, allowing you to enter the locations of each of your stores and displaying them automatically on an interactive map you can display on your website.
- Website Editor - Enter the Website Editor view of the system to update your website content and access all of the tools in this list, and more.
Marketing
Our Marketing modules offer a wealth of tools for helping you to reach out to customers and potential customers and sell them what you offer. Here are the tools:
- Communications - Use this module to see how all messages sent out by you and your team and by the system were delivered.
- Coupons - For both website and in-store promotions, create Coupons using this tool that allow discounts on all items or only specific ones.
- Email List - Using this module you can build and manage any number of Email Lists you might need.
- Email Newsletter - You can safely send Email messages to very large numbers of customers using this useful marketing tool.
- Newsletter Archive - If your newsletters have content that is valuable long-term, showcase those newsletters in the Newsletter Archive, which organizes and offers them to your website visitors.
- Request Review* - You can use the Request Review tool to send a review request by email or text to a satisfied customer.
- Scheduled Sale - This useful tool allows you to plan pricing changes for your sales events and set prices to change on specific days and times you need.
- Text Message* - You can send Text Messages to your customers you've flagged to be eligible to receive marketing text messages from you using this simple tool.
* The Marketing Package is required for this module to be active in your system, and requires an addition to your monthly billing.
Reports
The Reports area allows you great flexibility in how you view your sales and inventory data. Reports such as the End of Day, Transaction Detail, and Sales Details allow you many options in different ways you can filter your information. Other reports show you the current status in an area of the system, such as all current Class registrations and the current Inventory Value. The Reports page also has its own Favorites feature, so if you on the Reports button on the left, or click to View All, you can click Star buttons for the reports to which you need fast access.
- Report Favorites - This list appears here, and also appears up in the Favorites menu in the upper right, and if you hover your mouse over Reports and have any Favorites saved, you will see them there as well.
- Custom Report Configurations - The Sales Details report allows you to configure it in different ways and save different views you need. Items each user saves will appear only for that user in this area, as well as in the Favorites at the top, and when you hover over the Reports button.
- Star Buttons - Each report on the page has a Star button that allows you to set it as a Favorite. The favorites you save will only appear that way for you, and other users can set their own.
}', 38='{type=number, value=0}', 39='{type=number, value=6}', 40='{type=number, value=0}', 9='{type=string, value=Getting to Know the System}', 22='{type=option, value={id=1, name='featured_content', order=0, label='Featured Content'}}', 25='{type=number, value=0}', 26='{type=list, value=[{id=190209692688, name='Getting Started'}]}', 28='{type=string, value=Getting to Know the System Congratulations, you are using the best system for integrated website and point of sale! To begin using the system after you have logged in, please take a look at the following resources that are available to you: The Admin Tools This is the heart of the system, and you can access all of the functions and features of the system from the menus and buttons here. The buttons down the left side are the major modules, data tools, and reports of the system. Across the top are some useful utilities such as the system search, configuration and settings tools, Support, and some administrative functions such as the Time Clock. System Home The system Home page shown above is what you'll see whenever you log into the system, and has some useful features for you. You can get back to this page from anywhere by clicking the System Logo in the upper left corner. On the right you'll see the System Updates from the previous week, listing New features, Improved areas of the system, and bugs and glitches that we have Fixed. Need Assistance? On the left you'll see info on how to contact Support if you have something to report or a question on how to use the system. The more details you can provide, the better! Below the support area is a Suggest button you can use to tell us your ideas for how we can make the system work better for you. We review your Insights daily and the ones with the most votes are the ones we work on first, so get in and let us know which improvement are the ones that will be the most impactful for you. Favorites You are able to set parts of the system you frequently use to appear in this convenient menu, accessible in the upper left from anywhere in the system. When you hover your cursor over the Favorites button, you'll see any you've saved in the flyout menu. Modules and Tools - Different major parts of the system, such as the main Products list page or the Work Orders module, can be saved as Favorites and will appear in the list on the left. Reports - For the reports you use most, you can get to them with a single click by saving them as Favorites, and they will appear in the list on the right side of the flyout menu. Custom Reports - Some reports, such as the Sales Details report, allow you to configure custom views that you can easily load again and that update over time. Any of those you've saved will appear below the list of standard reports on the right. Save Your Favorites - Click either one of the Manage links to load the Favorites page, where you'll be able to click Star buttons for the features and reports you want in your Favorites menu. Register Our on-screen Register module will allow you to sell your in-store items, and has a wealth of features detailed fully here (this link will open in a new browser tab for you). When you open the app, you'll be asked to choose a Till, and you may need to enter a Register PIN code. Once you're all set you can start your first transaction, like the one below. Orders You can work with Website Orders that have come through in the Orders area on the left. This tool allows you to fulfill your web orders, refund them, mark them as shipped, and print out orders as needed. Inventory If you hover over the Inventory area on the left, you'll see a flyout menu of many useful tools. Assemble / Disassemble - If you are assembling a custom item, such as a piece of jewelry, the Assemble / Disassemble module allows you to put the components together into a unique product. Assemble Kits - You can use the Assemble Kits module to combine multiple products into a single bundled product. Batch Inventory - The Batch Inventory module allows you to collect quantity information and add it to the tool in batches that accumulate quantities so you can update your actual on-hand inventory numbers. Bin Locations - If you want to define Bin Locations throughout your store, you can do so here and those will be available when creating products so you can assign them to whatever bin is appropriate. Bulk - You can manage your products and inventory by spreadsheet in the Bulk area. Departments- You can add or edit the Departments you use for organizing and reporting on your products. Gift Cards - You can work with your Gift Cards (usable both online and in the Register), create any you might need for store use, and view a log of Gift Card events, if needed. Packages- The Packages module will give you the ability to offer different combinations of products as package deals at a single combo price. Precuts- You can use the Precuts module to break a product up into multiple products (e.g. you can create 4 quarter-yard Fat Quarters from a yard of fabric). Products- In the Products area, you can create a New Product, access a searchable and filterable list of your Products, and do on-screen bulk edits, exports and imports to spreadsheets and purchase orders, label prints, and deletions, if needed. Serialized- The Serialized inventory tool will let you adjust or add serial numbers to serialized inventory you sell. Services- You can work with your Services you use in Work Orders, adding new ones and configuring them as needed. Stones- This module allows you to work with your stock of Stones by cut, weight, type, etc. if you work with and sell precious stones. Transfers- If you have multiple locations, you can do Transfers of inventory as needed between locations. Modules The Modules menu on the left will give you access to some important parts of the system: Appraisals- Your Appraisals are available from here, and you can create new ones as needed. Classes- You can access your Classes from here, and you can create and schedule them as needed. Consignment- If you do Consignment selling, you can access your contracts and work with payouts here. Form Styles - If you need to print documents at letter size, the Form Styles module allows you to configure unique receipts, invoices, work orders, etc. for each of your Locations. Gift Registry - If you have Gift Registry active on your website, you are able to work with those lists here. Invoices- For your Invoices, you can view the list and work with any of them in this area. Layaway- The Layaways module lists your open Layaway agreements and you can open and work with them from there. Live Selling - The Live Selling feature allows you to use social media in live events that can be a successful way to sell items. Loaner- If you do Work Orders, you may want to keep track of any Loaner items you have out, and this module allows you to do so. Online School Rentals - You can manage and work with your school rental contracts in the Online School Rentals module. Payment Plans - If you offer Payment Plans for store-financed purchases, you can track and work with those agreements here. Quotes- You can see the active list of saved Quotes in the system by clicking that link, and those are all saved directly in the Register. Rental Contracts - You can see and work with open Rental Contracts if that part of the system is active for you. Restricted Items - If you need to limit access to some of your inventory, you can configure that in the Restricted Items module. Short Term Rentals - Your Short Term Rental functions are also here for you, allowing you to look up the Rental Status of any active Rental, view your Rental Calendar, and configure the system how you need it to work in the Rental Admin area. Special Orders - The Special Orders page shows a list of all active Special Orders you've created from the Register, allowing you to open and work with them as needed. Subscriptions- If you wish to do periodical Subscription sales, you can set that up in this area. Trial Purchases - For some items, customers will want to do Trial Purchases to make sure the item will work for their preferences. Work Orders - In the Work Orders module you can track and bill for any labor-based work, such as repairs. Purchasing The Purchasing section lets you work with all of your inventory ordering activities: Customer Purchase Orders - If your store is a 'vendor' for organizations that purchase over time throughout a fiscal period from a budget, the Customer Purchase Orders module will allow you to facilitate those purchases, for products and for work orders, and invoice the client as needed. Purchase Orders - You can access and work with your inventory orders from your vendors in the Purchase Orders module, creating new orders as needed. Receiving Orders - You can use the Receiving Orders module to work with your list of orders, and you can create new ones out of PO's made in this system or from scratch if you've already sent in an order. Vendor Consignment - If you do consignment selling with any of your vendors, you are able to track that and manage it through the Vendor Consignment module. Vendor Return - When inventory arrives in an unsellable condition, or for whatever reason might come up, you are able to use the Vendor Return module to handle that inventory reduction in the system. Vendors- Important contact information and a history of your vendor orders are available to you in your main Vendors list page. You can also start new inventory orders for a vendor when viewing their card from this list. Customers The system has excellent resources for working with your customers, from the main Customers list page where you can view one customer at a time, or bulk features and tools for groups and mailing lists in the Customer Filters area. Here are your options: Customer Groups - If you have groups of customers with whom you need to work and communicate in different ways, such as club members or top customers, the Customer Groups module allows you to make as many groups as you need. You are able to add any number of your customers to a group and email to that group as often as you like. Customers- Every website customer that orders from you and every Register customer for whom you create a customer entry will be listed on this page, with full details accessible and bulk features available if needed. Filter Customers - If you like the idea of building marketing email lists based on the shopping history of your customers, this module allows you to do so and create as many filtered lists as you might need. Tailored Product Lists - If you're working on a consultative sale that might take a few visits to close, the Tailored Lists area can allow you to save lists of such items for individual customers so you can track how it's going. Website Our website CMS (Content Management System) has robust tools for you to easily add and update the content you need. Here are your options: Calendar- Our website Calendar allows you to schedule and display information on one-time or recurring events, and can be customized for specific areas, such as your individual locations or by topic, such as a calendar listing only your classes. Categories- You can organize your products for display on the website using the Categories module. You can add sub-categories that go down any number of levels you might need. Files- Our Files tool allows you to manage any files needed in the system, including documents such as PDF file, general files such as audio or video or executable files you might want to sell through your website, or the different images you use throughout the system. Forms- You are able to create and publish website Forms in this module, and you can view responses and form submissions in bulk from here. Navigation- You can create as many website Navigation menu links to pages and resources as you need and organize them into drop-lists under your header items in the main menu. News- Let the world know about what's going on with your organization using the News module to post updates to your website as often as you like. Pages- Create individual website Pages and manage their publication here. If you have a lot of pages, you can organize them in folders to make them easier to find and edit. Store Locator - This tool is great for multi-location stores, allowing you to enter the locations of each of your stores and displaying them automatically on an interactive map you can display on your website. Website Editor - Enter the Website Editor view of the system to update your website content and access all of the tools in this list, and more. Marketing Our Marketing modules offer a wealth of tools for helping you to reach out to customers and potential customers and sell them what you offer. Here are the tools: Communications- Use this module to see how all messages sent out by you and your team and by the system were delivered. Coupons - For both website and in-store promotions, create Coupons using this tool that allow discounts on all items or only specific ones. Email List - Using this module you can build and manage any number of Email Lists you might need. Email Newsletter - You can safely send Email messages to very large numbers of customers using this useful marketing tool. Newsletter Archive - If your newsletters have content that is valuable long-term, showcase those newsletters in the Newsletter Archive, which organizes and offers them to your website visitors. Request Review* - You can use the Request Review tool to send a review request by email or text to a satisfied customer. Scheduled Sale - This useful tool allows you to plan pricing changes for your sales events and set prices to change on specific days and times you need. Text Message* - You can send Text Messages to your customers you've flagged to be eligible to receive marketing text messages from you using this simple tool. * The Marketing Package is required for this module to be active in your system, and requires an addition to your monthly billing. Reports The Reports area allows you great flexibility in how you view your sales and inventory data. Reports such as the End of Day, Transaction Detail, and Sales Details allow you many options in different ways you can filter your information. Other reports show you the current status in an area of the system, such as all current Class registrations and the current Inventory Value. The Reports page also has its own Favorites feature, so if you on the Reports button on the left, or click to View All, you can click Star buttons for the reports to which you need fast access. Report Favorites - This list appears here, and also appears up in the Favorites menu in the upper right, and if you hover your mouse over Reports and have any Favorites saved, you will see them there as well. Custom Report Configurations - The Sales Details report allows you to configure it in different ways and save different views you need. Items each user saves will appear only for that user in this area, as well as in the Favorites at the top, and when you hover over the Reports button. Star Buttons - Each report on the page has a Star button that allows you to set it as a Favorite. The favorites you save will only appear that way for you, and other users can set their own. Getting Started / Help onboarding system basics}', 31='{type=number, value=3}'}, {id=191604258426, createdAt=1750439292499, updatedAt=1769703982056, path='how-do-i-activate-the-customer-login-at-the-top-of-my-website', name='How do I activate the customer login at the top of my website?', 2='{type=string, value=http://rainpos.my.site.com/s/article/How-do-I-activate-the-customer-login-at-the-top-of-my-website}', 4='{type=list, value=[{id=1, name='rain_pos', order=0, label='Rain POS'}, {id=2, name='like_sew', order=1, label='Like Sew'}, {id=3, name='jewel360', order=2, label='Jewel360'}, {id=4, name='music_shop_360', order=3, label='Music Shop 360'}]}', 6='{type=string, value=
The Customer Login feature can be turned on if you're website is live and if you have your SSL enabled. Prior to your site going live, if you click your Admin button with your username in the upper right and then go to Settings > Website Settings > Shopping Cart, you will see the Customer Login Options section at the bottom of the page. If your site is not live, you will see a message like the one above. If it is live, you will see toggle controls like the ones pictured below that enable you to Allow Customer Login (customers will be able to see purchases, cards on file, reward points, and other info) and you can Allow Customers to Create and Share Gift Registries. For more information on Gift Registries, click here: Gift Registry
If the Customer Login feature is not yet active for you, you will need to talk to your Customer Success Manager about the time frame in which your website will be going live. That function is for your website customers and is different from the website Member logins, which are intended for use by wholesale customers or club members so they can have password-protected pages and pricing where needed. The Customer Login gives the customer access to their purchase history and to their Rewards. For more information on how to work with Customer logins, please click here: Customer Website Account Login.
}', 22='{type=option, value={id=3, name='faq', order=2, label='FAQ'}}', 9='{type=string, value=How do I activate the customer login at the top of my website?}', 25='{type=number, value=0}', 26='{type=list, value=[{id=190209692536, name='Admin'}, {id=190209692688, name='Getting Started'}]}', 28='{type=string, value=How do I activate the customer login at the top of my website? The Customer Login feature can be turned on if you're website is live and if you have your SSL enabled. Prior to your site going live, if you click your Admin button with your username in the upper right and then go to Settings > Website Settings > Shopping Cart, you will see the Customer Login Options section at the bottom of the page. If your site is not live, you will see a message like the one above. If it is live, you will see toggle controls like the ones pictured below that enable you to Allow Customer Login (customers will be able to see purchases, cards on file, reward points, and other info) and you can Allow Customers to Create and Share Gift Registries. For more information on Gift Registries, click here: Gift Registry If the Customer Login feature is not yet active for you, you will need to talk to your Customer Success Manager about the time frame in which your website will be going live. That function is for your website customers and is different from the website Member logins, which are intended for use by wholesale customers or club members so they can have password-protected pages and pricing where needed. The Customer Login gives the customer access to their purchase history and to their Rewards. For more information on how to work with Customer logins, please click here: Customer Website Account Login. Admin,Getting Started / Help login logout website settings system basics}'}, {id=191604258435, createdAt=1750439292508, updatedAt=1786991950933, path='how-do-i-get-to-my-system-settings', name='How do I get to my system settings?', 32='{type=number, value=2}', 2='{type=string, value=http://rainpos.my.site.com/s/article/How-do-I-get-to-my-system-settings}', 4='{type=list, value=[{id=1, name='rain_pos', order=0, label='Rain POS'}, {id=2, name='like_sew', order=1, label='Like Sew'}, {id=3, name='jewel360', order=2, label='Jewel360'}, {id=4, name='music_shop_360', order=3, label='Music Shop 360'}]}', 6='{type=string, value=
Once you have logged into the system, in the upper right, click on the Admin Button with your username. In the drop-list, click on Settings. Some areas of the system have settings you can configure directly in their menus, for example, if you go to Inventory > Gift Cards, there are settings for your Gift Cards there. Another area is Rentals, e.g. Modules > Rental Admin > Settings, but most settings for LifeSaver Software are in this main Settings area.
}', 22='{type=option, value={id=3, name='faq', order=2, label='FAQ'}}', 9='{type=string, value=How do I get to my system settings?}', 25='{type=number, value=0}', 26='{type=list, value=[{id=190209692688, name='Getting Started'}]}', 28='{type=string, value=How do I get to my system settings? Once you have logged into the system, in the upper right, click on the Admin Button with your username. In the drop-list, click on Settings. Some areas of the system have settings you can configure directly in their menus, for example, if you go to Inventory > Gift Cards, there are settings for your Gift Cards there. Another area is Rentals, e.g. Modules > Rental Admin > Settings, but most settings for LifeSaver Software are in this main Settings area. Getting Started / Help onboarding system basics}', 31='{type=number, value=0}'}, {id=191604258483, createdAt=1750439292556, updatedAt=1769704120923, path='how-to-set-up-your-shopping-page', name='How to Set Up Your Shopping Page', 2='{type=string, value=http://rainpos.my.site.com/s/article/How-to-Set-Up-Your-Shopping-Page}', 4='{type=list, value=[{id=1, name='rain_pos', order=0, label='Rain POS'}, {id=2, name='like_sew', order=1, label='Like Sew'}, {id=3, name='jewel360', order=2, label='Jewel360'}, {id=4, name='music_shop_360', order=3, label='Music Shop 360'}]}', 6='{type=string, value=
Setting Up Your Shopping Page
You can create your shopping page by clicking on Website in the blue Admin Toolbar and then clicking Pages.
Here are some elements you should have on your main shopping page:
- Products Module - See steps below for how to put it on the page and customize the heading.
- Credit Card / Buy Now - Pay Later Logos - See resources below for your processor.
- Free Shipping Offer / Special Discount Offer - Ideally, at some level, you offer free domestic shipping, usually for orders over a certain amount. It is difficult to be competitive online without an offer like this, but if you don't want to offer free shipping, at least put up some kind of special offer. More info on the how-to below.
- Link to Policies & Privacy Statement - It is required by law if you do online commerce to post your privacy policy and let people know how you will handle their sensitive information, and it is highly encouraged to have your policies clearly stated and easy to find. Links to these above the fold (in the initial page load view) on your main shopping page are a necessity. Example text you can use as well as how-to on posting your links is here: Essential Content - Policies & Privacy Statement.
- Gift Cards - If you sell Gift Cards online and/or in store, putting the module on your shopping page is a good idea, anyone looking for them might look there first. Click here to learn more about working with your Gift Cards.
1) Place the Products Module on the Page
- Click +Add Content at the top of the page and click Add Body Content in the drop-list.
- Scroll down the list of modules to the Products module and click Add.
- If you want to customize the heading of Products, in the small gray Module Toolbar, click the second button (the gear-shaped one) to open your module Settings.
- Customize or remove the current Products heading (if you'll be manually creating one), as you like, then click Save.
2) Credit Card / BNPL (Buy Now / Pay Later) Logos
Here are logos for processors that work with LifeSaver Software and for major credit cards. The LifeSaver Software system supports all major U.S. credit card types. Place the appropriate logos / graphics on your shopping page near the top (as pictured above). For more detail on how to add images to a page, click here: How to Add or Change Images. Right-click to save any of the images below you might need:
3) Free Shipping Offer / Special Discount Offer
Add a statement like the one shown in the example shopping page above, ideally about Free Shipping. To learn how to set up free shipping, click here: How to Set Up Shipping Methods. You can also create a Coupon for free shipping, click here to learn more about creating Coupon codes: Coupons.
4) Link to Policy / Privacy Statement
One critical element you should have is a page that spells out your shopping, shipping, and order fulfillment policies as well as a comprehensive statement on how you will keep customer data safe so those are in writing for your customers. For a detailed look at what that page needs and how to put it together, click here: Essential Content - Policies & Privacy Statement
5) Add a Gift Cards Module to the Page
If you offer Gift Cards in the system, you can sell them electronically through your online store in a process that requires no physical fulfillment from you. Your customers will be able to select from a list of amounts you set and buy a card code they can use online or in your store. To add the module to the page, click the Add Content link at the top and click to add it to the Body area, then scroll down the list of modules and click the Add button for the Gift Cards module. It will look similar to what is pictured below. For full details on how to configure and work with your Gift Cards, click here: Gift Cards
}', 22='{type=option, value={id=2, name='recommended_extra', order=1, label='Recommended Extra'}}', 9='{type=string, value=How to Set Up Your Shopping Page}', 25='{type=number, value=0}', 26='{type=list, value=[{id=190209692539, name='Website'}]}', 28='{type=string, value=How to Set Up Your Shopping Page Setting Up Your Shopping Page You can create your shopping page by clicking on Website in the blue Admin Toolbar and then clicking Pages. Here are some elements you should have on your main shopping page: Products Module - See steps below for how to put it on the page and customize the heading. Credit Card / Buy Now - Pay Later Logos - See resources below for your processor. Free Shipping Offer / Special Discount Offer - Ideally, at some level, you offer free domestic shipping, usually for orders over a certain amount. It is difficult to be competitive online without an offer like this, but if you don't want to offer free shipping, at least put up some kind of special offer. More info on the how-to below. Link to Policies & Privacy Statement - It is required by law if you do online commerce to post your privacy policy and let people know how you will handle their sensitive information, and it is highly encouraged to have your policies clearly stated and easy to find. Links to these above the fold (in the initial page load view) on your main shopping page are a necessity. Example text you can use as well as how-to on posting your links is here: Essential Content - Policies & Privacy Statement. Gift Cards - If you sell Gift Cards online and/or in store, putting the module on your shopping page is a good idea, anyone looking for them might look there first. Click here to learn more about working with your Gift Cards. 1) Place the Products Module on the Page Click +Add Content at the top of the page and click Add Body Content in the drop-list. Scroll down the list of modules to the Products module and click Add. If you want to customize the heading of Products, in the small gray Module Toolbar, click the second button (the gear-shaped one) to open your module Settings. Customize or remove the current Products heading (if you'll be manually creating one), as you like, then click Save. 2) Credit Card / BNPL (Buy Now / Pay Later) Logos Here are logos for processors that work with LifeSaver Software and for major credit cards. The LifeSaver Software system supports all major U.S. credit card types. Place the appropriate logos / graphics on your shopping page near the top (as pictured above). For more detail on how to add images to a page, click here: How to Add or Change Images. Right-click to save any of the images below you might need: 3) Free Shipping Offer / Special Discount Offer Add a statement like the one shown in the example shopping page above, ideally about Free Shipping. To learn how to set up free shipping, click here: How to Set Up Shipping Methods. You can also create a Coupon for free shipping, click here to learn more about creating Coupon codes: Coupons. 4) Link to Policy / Privacy Statement One critical element you should have is a page that spells out your shopping, shipping, and order fulfillment policies as well as a comprehensive statement on how you will keep customer data safe so those are in writing for your customers. For a detailed look at what that page needs and how to put it together, click here: Essential Content - Policies & Privacy Statement 5) Add a Gift Cards Module to the Page If you offer Gift Cards in the system, you can sell them electronically through your online store in a process that requires no physical fulfillment from you. Your customers will be able to select from a list of amounts you set and buy a card code they can use online or in your store. To add the module to the page, click the Add Content link at the top and click to add it to the Body area, then scroll down the list of modules and click the Add button for the Gift Cards module. It will look similar to what is pictured below. For full details on how to configure and work with your Gift Cards, click here: Gift Cards Website ecommerce pages web page modules}'}, {id=191604258607, createdAt=1750439292610, updatedAt=1769704301873, path='quickbooks-connector-setup-step-3-setting-up-your-accounts', name='Quickbooks Connector Setup Step 3: Setting Up Your Accounts', 2='{type=string, value=http://rainpos.my.site.com/s/article/Quickbooks-Connector-Setup-Step-3-Setting-Up-Your-Accounts}', 4='{type=list, value=[{id=1, name='rain_pos', order=0, label='Rain POS'}, {id=2, name='like_sew', order=1, label='Like Sew'}, {id=3, name='jewel360', order=2, label='Jewel360'}, {id=4, name='music_shop_360', order=3, label='Music Shop 360'}]}', 6='{type=string, value=
The integration between your Point of Sale and QuickBooks will need several Accounts that may not exist within your Quickbooks. In this step we will be creating and setting up all of the Accounts you will need. Start by opening your desktop Windows version of Quickbooks.
Checking Chart of Accounts
The following account types must be available to map to. If they are not, you’ll need to create them. You can check the list below in your Quickbooks by clicking on Lists > Chart of Accounts. Click here to download a printable checklist if you want a hard copy to work from.
| Account Type | Account Name | Purpose |
| Accounts Receivable | Accounts Receivable | Used for On-Account purchases |
| Other Current Asset | Inventory Assets | For Inventory Assets |
| Other Current Asset | Undeposited Funds | Account for undeposited funds such as Checks, Cash, Paypal and Credit |
| Other Current Liability | Gift Cards | Balance for Gift Cards bought and used |
| Other Current Liability | Layaway | Balance of Layaways |
| Income | Merchandise Sales | Record of sales |
| Income | Shipping | Record of customer payments for Shipping |
| Cost of Goods Sold | Cost of Goods Sold | For Cost of Goods Sold |
Why should I name these accounts this way?
The LifeSaver Software system refers to certain elements in specific ways, a good example is Gift Cards. Throughout the system, they are referred to as Gift Cards, even if you actually sell Gift Certificates instead.
How to Create and Set Up Accounts
One important question you need to answer for your Accounts setup is 'Where will funds land in QuickBooks?' The answer will either be Direct Deposit to a bank or other account, or it will be to Undeposited Funds, which is a holding account. The most common setup is to have funds go to Undeposited Funds, so we will start with that example. Here is a sample list of Accounts in the Chart of Accounts:
In our example, let's say that one of the Accounts you need to add is Undeposited Funds. To create that Account, look at the bottom of the Chart of Accounts window and click on Account and in the drop-list, click New.

When creating your Account you will first choose the Type, and for Undeposited Funds you will click Other Account Types and in the drop-list, click Other Current Asset.
In the Other Current Asset window, enter the Account Name for Undeposited Funds and then save the entry.
Please Note: There is a 30-character limit to account names you enter.
If you do Layaways, you will also want those funds and amounts properly accounted for, so you will set an account for Layaways up as an Other Current Liability with the Account Name of Layaway.
COGS/Assets by Department
If you would like to have your COGS/Assets organized by product departments, you must create COGS and Asset accounts depending on how you want your COGS to be split. For example:
Clothing COGS - Clothing Asset
Book COGS – Book Asset
Gift COGS – Gift Asset
Please Note: Most of our clients do not go to this level of detail, and prefer to track individual Department asset values in the LifeSaver Software Point of Sale system reports.
Payment Separated into Bank Accounts (OPTIONAL)
The default and recommended setup sends all income into Undeposited Funds. This allows the store owner to balance totals before depositing them into the Business Bank Account. Some customers alternatively prefer to have all cash go straight to a bank account designated for that purpose, checks to another account and credit cards to a third.
To have funds deposited in this way, you must create both the Holding Account and the Bank accounts in your chart of accounts. You must either send all invoices to undeposited funds or else to the holding account/bank accounts.
Create Shipping and Sales Items
Go to Lists at the top of the screen, and from the drop-down choose Item List.
Your sales tax will already be listed. You will need to add the following items:
Shipping – Type: Non-Inventory Part – Account: Choose the Shipping Income Account created above.
Merchandise Sales – Type: Non-Inventory Part – Account: Choose the Sales Income Account created above.
Add Payment Methods
Many of these payment methods may already be listed in QB. You only need to add those that are not in the list, or edit existing payment methods so that they match what is listed below.
Go to Lists, and choose Customer and Vendor Profile List from the drop down.
From that drop-down menu choose Payment Method list.
The following payment methods need to be listed, EXACTLY as you see them:
| Method | Type |
| Cash | Cash |
| Check | Check |
| American Express | American Express |
| Discover | Discover |
| MasterCard | MasterCard |
| Visa | Visa |
| Debit | Debit Card |
| Paypal | Other |
| Gift Card | Gift Card |
| Account | Other |
| Outside Financing | Other |
| o.f. | Other |
| Credit Card | Other Credit Card |
Please make sure that the payment types in the Method column are spelled exactly the way they show above, including periods spaces and capitalization. The naming of these accounts has to be perfect, without any letters misplaced, in order to properly sync with LifeSaver Software.
You have now configured Quickbooks to work with the Point of Sale system!
Coming Up Next: Install and configure the QB Connector Application.
Go to the next step:
Quickbooks Connector Setup Step 4: Installing the Application
}', 22='{type=option, value={id=3, name='faq', order=2, label='FAQ'}}', 9='{type=string, value=Quickbooks Connector Setup Step 3: Setting Up Your Accounts}', 25='{type=number, value=0}', 26='{type=list, value=[{id=190209692545, name='Settings'}]}', 28='{type=string, value=Quickbooks Connector Setup Step 3: Setting Up Your Accounts The integration between your Point of Sale and QuickBooks will need several Accounts that may not exist within your Quickbooks. In this step we will be creating and setting up all of the Accounts you will need. Start by opening your desktop Windows version of Quickbooks. Checking Chart of Accounts The following account types must be available to map to. If they are not, you’ll need to create them. You can check the list below in your Quickbooks by clicking on Lists > Chart of Accounts. Click here to download a printable checklist if you want a hard copy to work from. Account Type Account Name Purpose Accounts Receivable Accounts Receivable Used for On-Account purchases Other Current Asset Inventory Assets For Inventory Assets Other Current Asset Undeposited Funds Account for undeposited funds such as Checks, Cash, Paypal and Credit Other Current Liability Gift Cards Balance for Gift Cards bought and used Other Current Liability Layaway Balance of Layaways Income Merchandise Sales Record of sales Income Shipping Record of customer payments for Shipping Cost of Goods Sold Cost of Goods Sold For Cost of Goods Sold Why should I name these accounts this way? The LifeSaver Software system refers to certain elements in specific ways, a good example is Gift Cards. Throughout the system, they are referred to as Gift Cards, even if you actually sell Gift Certificates instead. How to Create and Set Up Accounts One important question you need to answer for your Accounts setup is 'Where will funds land in QuickBooks?' The answer will either be Direct Deposit to a bank or other account, or it will be to Undeposited Funds, which is a holding account. The most common setup is to have funds go to Undeposited Funds, so we will start with that example. Here is a sample list of Accounts in the Chart of Accounts: In our example, let's say that one of the Accounts you need to add is Undeposited Funds. To create that Account, look at the bottom of the Chart of Accounts window and click on Account and in the drop-list, click New. When creating your Account you will first choose the Type, and for Undeposited Funds you will click Other Account Types and in the drop-list, click Other Current Asset. In the Other Current Asset window, enter the Account Name for Undeposited Funds and then save the entry. Please Note: There is a 30-character limit to account names you enter. If you do Layaways, you will also want those funds and amounts properly accounted for, so you will set an account for Layaways up as an Other Current Liability with the Account Name of Layaway. COGS/Assets by Department If you would like to have your COGS/Assets organized by product departments, you must create COGS and Asset accounts depending on how you want your COGS to be split. For example: Clothing COGS - Clothing Asset Book COGS – Book Asset Gift COGS – Gift Asset Please Note: Most of our clients do not go to this level of detail, and prefer to track individual Department asset values in the LifeSaver Software Point of Sale system reports. Payment Separated into Bank Accounts (OPTIONAL) The default and recommended setup sends all income into Undeposited Funds. This allows the store owner to balance totals before depositing them into the Business Bank Account. Some customers alternatively prefer to have all cash go straight to a bank account designated for that purpose, checks to another account and credit cards to a third. To have funds deposited in this way, you must create both the Holding Account and the Bank accounts in your chart of accounts. You must either send all invoices to undeposited funds or else to the holding account/bank accounts. Create Shipping and Sales Items Go to Lists at the top of the screen, and from the drop-down choose Item List. Your sales tax will already be listed. You will need to add the following items: Shipping – Type: Non-Inventory Part – Account: Choose the Shipping Income Account created above. Merchandise Sales – Type: Non-Inventory Part – Account: Choose the Sales Income Account created above. Add Payment Methods Many of these payment methods may already be listed in QB. You only need to add those that are not in the list, or edit existing payment methods so that they match what is listed below. Go to Lists, and choose Customer and Vendor Profile List from the drop down. From that drop-down menu choose Payment Method list. The following payment methods need to be listed, EXACTLY as you see them: Method Type Cash Cash Check Check American Express American Express Discover Discover MasterCard MasterCard Visa Visa Debit Debit Card Paypal Other Gift Card Gift Card Account Other Outside Financing Other o.f. Other Credit Card Other Credit Card Please make sure that the payment types in the Method column are spelled exactly the way they show above, including periods spaces and capitalization. The naming of these accounts has to be perfect, without any letters misplaced, in order to properly sync with LifeSaver Software. You have now configured Quickbooks to work with the Point of Sale system! Coming Up Next: Install and configure the QB Connector Application. Go to the next step: Quickbooks Connector Setup Step 4: Installing the Application Settings pos settings}'}, {id=191604258618, createdAt=1750439292621, updatedAt=1761958795751, path='sell-a-gift-card', name='Sell a Gift Card', 32='{type=number, value=0}', 2='{type=string, value=http://rainpos.my.site.com/s/article/Sell-a-Gift-Card}', 4='{type=list, value=[{id=1, name='rain_pos', order=0, label='Rain POS'}, {id=2, name='like_sew', order=1, label='Like Sew'}, {id=3, name='jewel360', order=2, label='Jewel360'}, {id=4, name='music_shop_360', order=3, label='Music Shop 360'}]}', 6='{type=string, value=
Steps for Selling Gift Cards in the Register
- Go to the Register by clicking the Register Button in the upper left of the Admin Toolbar.
- Click the Gift Card link in the upper middle of the Register screen.
- You can either use the automatically generated Gift Card Code, OR you can scan in a code from a pre-printed card, OR you can manually enter your own code.
- It is recommended to enter a unique Title for every Gift Card you sell, as an alternative way to look it up.
- Enter the Amount.
- You can Print a more attractive version of the Gift Card by clicking the Print button.
- Click Save, the Gift Card will be entered as a line-item on the transaction. Under Settings > POS Settings you can choose whether or not your Gift Cards are eligible for discounts. The Gift Card will be usable in the Point of Sale or through the website shopping cart.
- Complete the transaction in the normal way.
}', 22='{type=option, value={id=2, name='recommended_extra', order=1, label='Recommended Extra'}}', 9='{type=string, value=Sell a Gift Card}', 25='{type=number, value=0}', 26='{type=list, value=[{id=190209692537, name='Inventory'}, {id=190209692541, name='Register'}]}', 28='{type=string, value=Sell a Gift Card Steps for Selling Gift Cards in the Register Go to the Register by clicking the Register Button in the upper left of the Admin Toolbar. Click the Gift Card link in the upper middle of the Register screen. You can either use the automatically generated Gift Card Code, OR you can scan in a code from a pre-printed card, OR you can manually enter your own code. It is recommended to enter a unique Title for every Gift Card you sell, as an alternative way to look it up. Enter the Amount. You can Print a more attractive version of the Gift Card by clicking the Print button. Click Save, the Gift Card will be entered as a line-item on the transaction. Under Settings > POS Settings you can choose whether or not your Gift Cards are eligible for discounts. The Gift Card will be usable in the Point of Sale or through the website shopping cart. Complete the transaction in the normal way. Inventory,Register}', 31='{type=number, value=1}'}, {id=191604258636, createdAt=1750439292639, updatedAt=1774718580626, path='use-a-gift-card-as-payment-in-the-register', name='Use a Gift Card as Payment in the Register', 32='{type=number, value=0}', 2='{type=string, value=http://rainpos.my.site.com/s/article/Use-a-Gift-Card-as-Payment-in-the-Register}', 4='{type=list, value=[{id=1, name='rain_pos', order=0, label='Rain POS'}, {id=2, name='like_sew', order=1, label='Like Sew'}, {id=3, name='jewel360', order=2, label='Jewel360'}, {id=4, name='music_shop_360', order=3, label='Music Shop 360'}]}', 6='{type=string, value=
Steps for Using Gift Cards as Payment in the Register
- Go to the Register and enter the items for sale in the normal way.
- When you begin entering payment methods, click on the Other Payment Options button in the lower right of the Register.
- In the Other Payment Methods panel that opens, Click on Gift Card.
- You can either scan in the barcode of the Gift Card, OR you can manually enter the Gift Card Code. You can see all active Gift Cards by going to Inventory > Gift Cards if you need to look one up.
- Gift Cards matching the code will appear in a drop list under the code, click on the appropriate card.
- You can choose whatever amount is appropriate. Any amount left on the card will be usable for later purchases.
- Once you have the payment configured, click Save.
- Complete the transaction in the normal way.
}', 22='{type=option, value={id=3, name='faq', order=2, label='FAQ'}}', 9='{type=string, value=Use a Gift Card as Payment in the Register}', 25='{type=number, value=0}', 26='{type=list, value=[{id=190209692541, name='Register'}]}', 28='{type=string, value=Use a Gift Card as Payment in the Register Steps for Using Gift Cards as Payment in the Register Go to the Register and enter the items for sale in the normal way. When you begin entering payment methods, click on the Other Payment Options button in the lower right of the Register. In the Other Payment Methods panel that opens, Click on Gift Card. You can either scan in the barcode of the Gift Card, OR you can manually enter the Gift Card Code. You can see all active Gift Cards by going to Inventory > Gift Cards if you need to look one up. Gift Cards matching the code will appear in a drop list under the code, click on the appropriate card. You can choose whatever amount is appropriate. Any amount left on the card will be usable for later purchases. Once you have the payment configured, click Save. Complete the transaction in the normal way. Register}', 31='{type=number, value=1}'}, {id=191604258698, createdAt=1750439292701, updatedAt=1791201375214, path='coupon-and-discount-stacking-in-the-register-and-website', name='Coupon and Discount Stacking in the Register and Website', 32='{type=number, value=1}', 2='{type=string, value=https://rainpos.my.site.com/s/article/Coupon-and-Discount-Stacking-in-the-Register-and-Website}', 4='{type=list, value=[{id=1, name='rain_pos', order=0, label='Rain POS'}, {id=2, name='like_sew', order=1, label='Like Sew'}, {id=3, name='jewel360', order=2, label='Jewel360'}, {id=4, name='music_shop_360', order=3, label='Music Shop 360'}]}', 6='{type=string, value=
Offer your customers the best possible savings with the Coupon & Discount Stacking feature while you maintain control over the way your discounts work! This feature lets you manage how multiple coupons and discounts can be applied when selling face to face in the Register and when selling through your website. Take a look!
Stacking Coupons and Discounts in the Register
To begin configuring how you want your coupons and discounts to work in the Register, click the Admin Button in the upper right that has your username and go to Settings > POS Settings. The General tab will open for you and you can find the Coupons & Discounts section near the bottom.
You have a several options for how multiple discounts and/or coupons can be applied in the Register.
- The primary setting for Coupon & Discount Stacking will apply by default to individual line-item discounts, transaction-based discounts that cover all eligible items in the transaction, and coupon codes used in the Register that can be applied to individual products or entire departments, or to all items, depending on how the coupon is configured. Here are the options for Stacking:
- Apply Highest Saving - This setting is the default and will apply only one discount: whichever one offers the greatest discounted amount.
- Apply All - This will combine all added discounts and coupons and can result in very large (up to 100% off) discounts, depending on how many are added.
-
You can turn off the Line Item Discounts if you don't want to allow specific discounts on individual line items. By default this is on.
-
For the Discount Override for Non-Discountable Items setting, it applies to line-items in the Register. If you check the box for this setting, it will not allow items to be discounted if they are set to not allow discounts in the Product, Service, or Class, or at the Department level. Normally in the Register users can override such settings if needed. If the above setting for Line Item Discounts is disabled, this option is grayed out.
-
If you sell services through your Register, you can choose to Apply Transaction Discounts to Services if you wish for those to be discountable. This applies only to line-item services added manually to the Register.
-
You can Apply Transaction Discounts to Purchased Gift Cards if you wish. Be aware, discounting the original card purchase might be 'double-dipping' by also allowing items purchased with the Gift Card to be discounted as well. Most stores leave this setting off.
-
The Disable Coupons & Discounts for Sale Price Items is a setting for which many of our clients have asked. If you check the box for this setting, items with an active Sale Price will not be discounted, even if they would normally be eligible.
When working with discounts and coupons in the Register, you can see a breakdown of all that have been applied or you can manually adjust discounts by clicking on the Discount link in the register sidebar, as pictured here:
Stacking Coupons on Your Website
For your website, your customers can get discounts via coupons you offer, and there is a settings area that allows you to configure how that works. Click on the Admin Button with your username in the upper left of the system and go to Settings > Website Settings > Shopping Cart. Scroll down the page until you see the section for Coupons like the one pictured below.
You have a couple of options for how multiple coupons can be applied in the website for your customers:
- The primary setting for Coupon Stacking will apply to all active coupon codes that might be added at checkout by a customer. Here are the options for Stacking:
- Apply Highest Saving - This setting is the default and will apply only one coupon code discount: whichever one offers the greatest discounted amount.
- Apply All - This will combine all added coupons and can result in very large (up to 100% off) discounts, depending on how many are added.
- The Disable Coupons Sale Price Items is a setting for which many of our clients have asked. If you check the box for this setting, items with an active Sale Price will not be discounted, even if they would normally be eligible.
}', 22='{type=option, value={id=3, name='faq', order=2, label='FAQ'}}', 39='{type=number, value=0}', 40='{type=number, value=1}', 9='{type=string, value=Coupon and Discount Stacking in the Register and Website}', 25='{type=number, value=0}', 26='{type=list, value=[{id=190209692538, name='Marketing'}, {id=190209692541, name='Register'}, {id=190209692545, name='Settings'}]}', 28='{type=string, value=Coupon and Discount Stacking in the Register and Website Offer your customers the best possible savings with the Coupon & Discount Stacking feature while you maintain control over the way your discounts work! This feature lets you manage how multiple coupons and discounts can be applied when selling face to face in the Register and when selling through your website. Take a look! Stacking Coupons and Discounts in the Register To begin configuring how you want your coupons and discounts to work in the Register, click the Admin Button in the upper right that has your username and go to Settings > POS Settings. The General tab will open for you and you can find the Coupons & Discounts section near the bottom. You have a several options for how multiple discounts and/or coupons can be applied in the Register. The primary setting for Coupon & Discount Stacking will apply by default to individual line-item discounts, transaction-based discounts that cover all eligible items in the transaction, and coupon codes used in the Register that can be applied to individual products or entire departments, or to all items, depending on how the coupon is configured. Here are the options for Stacking: Apply Highest Saving - This setting is the default and will apply only one discount: whichever one offers the greatest discounted amount. Apply All - This will combine all added discounts and coupons and can result in very large (up to 100% off) discounts, depending on how many are added. You can turn off the Line Item Discounts if you don't want to allow specific discounts on individual line items. By default this is on. For the Discount Override for Non-Discountable Items setting, it applies to line-items in the Register. If you check the box for this setting, it will not allow items to be discounted if they are set to not allow discounts in the Product, Service, or Class, or at the Department level. Normally in the Register users can override such settings if needed. If the above setting for Line Item Discounts is disabled, this option is grayed out. If you sell services through your Register, you can choose to Apply Transaction Discounts to Services if you wish for those to be discountable. This applies only to line-item services added manually to the Register. You can Apply Transaction Discounts to Purchased Gift Cards if you wish. Be aware, discounting the original card purchase might be 'double-dipping' by also allowing items purchased with the Gift Card to be discounted as well. Most stores leave this setting off. The Disable Coupons & Discounts for Sale Price Items is a setting for which many of our clients have asked. If you check the box for this setting, items with an active Sale Price will not be discounted, even if they would normally be eligible. When working with discounts and coupons in the Register, you can see a breakdown of all that have been applied or you can manually adjust discounts by clicking on the Discount link in the register sidebar, as pictured here: Stacking Coupons on Your Website For your website, your customers can get discounts via coupons you offer, and there is a settings area that allows you to configure how that works. Click on the Admin Button with your username in the upper left of the system and go to Settings > Website Settings > Shopping Cart. Scroll down the page until you see the section for Coupons like the one pictured below. You have a couple of options for how multiple coupons can be applied in the website for your customers: The primary setting for Coupon Stacking will apply to all active coupon codes that might be added at checkout by a customer. Here are the options for Stacking: Apply Highest Saving - This setting is the default and will apply only one coupon code discount: whichever one offers the greatest discounted amount. Apply All - This will combine all added coupons and can result in very large (up to 100% off) discounts, depending on how many are added. The Disable Coupons Sale Price Items is a setting for which many of our clients have asked. If you check the box for this setting, items with an active Sale Price will not be discounted, even if they would normally be eligible. Marketing,Register,Settings pos settings}', 31='{type=number, value=1}'}, {id=191604258701, createdAt=1750439292704, updatedAt=1784680215516, path='create-a-promotional-store-use-gift-card', name='Create a Promotional / Store Use Gift Card', 32='{type=number, value=2}', 2='{type=string, value=https://rainpos.my.site.com/s/article/Create-a-Promotional-Store-Use-Gift-Card}', 4='{type=list, value=[{id=1, name='rain_pos', order=0, label='Rain POS'}, {id=2, name='like_sew', order=1, label='Like Sew'}, {id=3, name='jewel360', order=2, label='Jewel360'}, {id=4, name='music_shop_360', order=3, label='Music Shop 360'}]}', 6='{type=string, value=
Steps for Manually Creating Gift Cards
- Go to Inventory > Gift Cards.
- Click the + Add New Gift Card button in the upper left.
- You can either use the automatically generated Gift Card Code, OR you can scan in a code from a pre-printed card, OR you can manually enter your own code.
- It is recommended to enter a unique Title for every Gift Card you create, as an alternative way to look it up.
- Enter the Amount.
- Click the Add Gift Card button. The Gift Card will be usable in the Point of Sale or through the website shopping cart.
Filter by Category
- Reports
- Getting Started
- Customers
- Customers
- Customers
- Getting Started
- Customers
- Customers
- Invoices
- Inventory
- Inventory
- Inventory
- Inventory
- Inventory
- Inventory
- Getting Started
- Inventory
- Inventory
- Inventory
- Inventory
- Getting Started
- Invoices
- Invoices
- Getting Started
- Invoices
- Invoices
- Invoices
- Invoices
- Invoices
- Getting Started
- Invoices
- Getting Started
- Work Orders
- Work Orders
- Work Orders
- Getting Started
- Work Orders
- Work Orders
- Work Orders
- Work Orders
- Work Orders
- Work Orders
- Production
- Production
- Production
- Getting Started
- Production
- Reports
- Getting Started
- Reports
- Reports
- Reports
- Reports
- Reports
- Reports
- Reports
- Reports
- Reports
- Reports
- Reports
- Reports
- Reports
- Reports
- Settings
- Getting Started
- Settings
- Getting Started
- Settings
- Settings
- Getting Started
- Settings
- Getting Started
- Settings
- Settings
- Settings
- Settings
- Settings
- Getting Started
- Settings
- Settings
- Settings
- Getting Started
- Settings
- Inventory
- Getting Started
- Getting Started
- Getting Started
- Getting Started
- Getting Started
- Getting Started
- Getting Started
- Getting Started
- Getting Started
- Getting Started
- Settings
- Settings
- Marketing
- Settings
- Getting Started
- Inventory
- Inventory
- Payments
- Admin
- Admin
- Admin
- Inventory
Search results for: Gift Cards
AI Overview
Sort by Relevance
Description
No exact match found. We are trying to find relevant matches. Please wait or add a new keyword.
Need Help?
Can't quite find the answer you're looking for? Our support team is just a call away.