Creating a Service Special in LifeSaver Software lets you customize labor, mounting, or other Service offerings in your shop. You can select Services and Specials as part of a work order. LifeSaver Software displays any Services you’ve created at the bottom of the Work Order page, where you can select them to include their associated fees and details. In this article, you’ll learn how to create Service Types and individual Services that match your business’s needs.
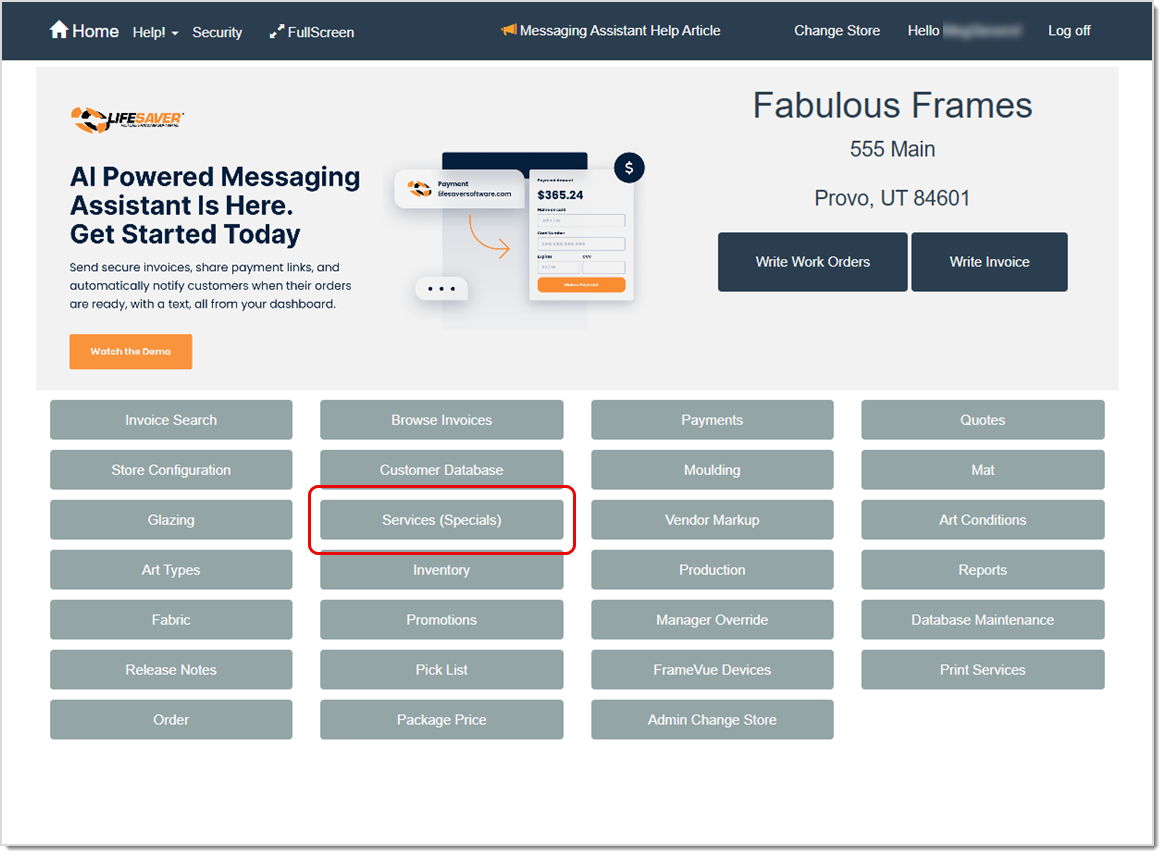
To access this feature, click the Services (Specials) button on your Home page.
Relevant Store Configuration Settings
Your Store Configuration includes several options that affect how you use Services (Specials). You’ll find these listed below.
To access these settings, click the Store Configuration button on your Home page. Then, on the Settings tab, review the following options:
- Use Default Fitting Charge
- Labor As A Percent Of Materials
The Services Page
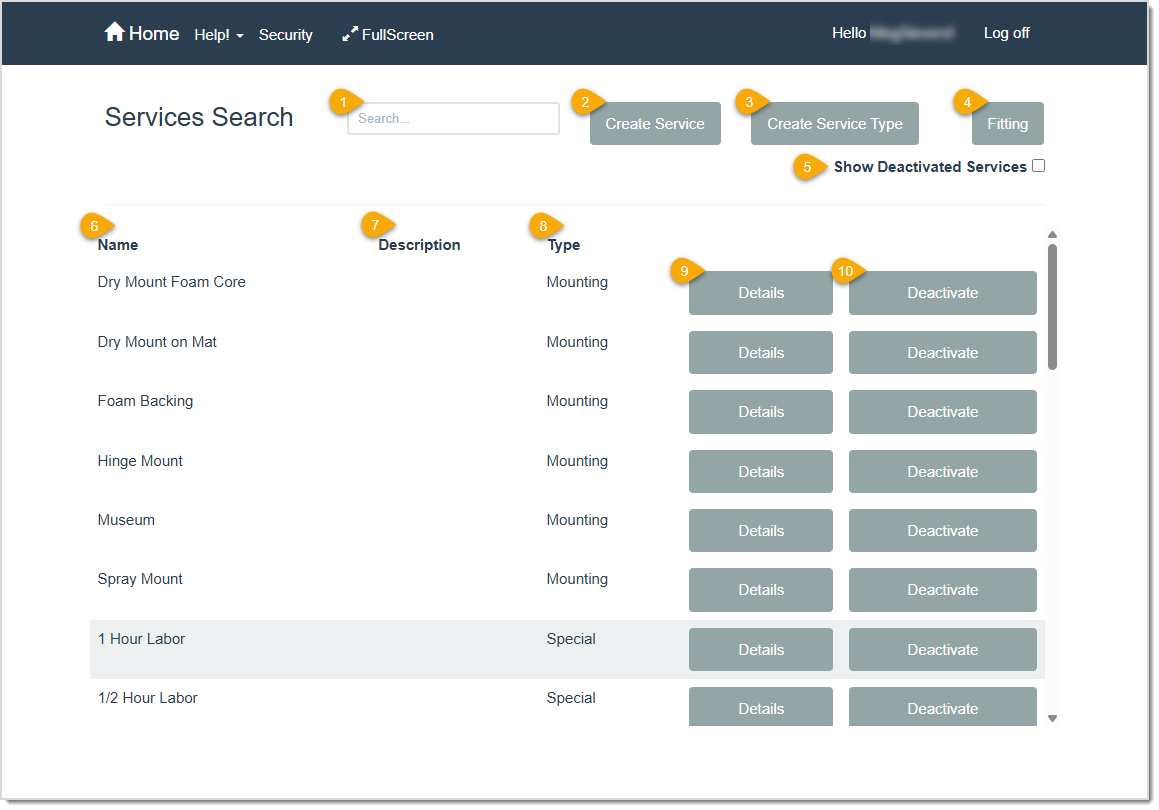
- Search – Start entering a name, description, or other identifying information to search for a specific Service / Special. LifeSaver Software automatically searches for matches as you type.
- Create Service – Click this button to open the Special Details page and create a new Service offering.
- Create Service Type – Click this button to open the Service Types page where you can create a new Service type category or deactivate / reactivate an existing one.
- Fitting – Click this button to edit your fitting fees on the Fitting page.
- Show Deactivated Services – Select this option to include inactive Services in your search results.
- Name – This column shows the name of the Service / Special.
- Description – This column shows the description of the Service / Special.
- Type – This column shows the Service Type used to categorize each Service.
- Details – Click this button to open the Special Details page where you can view and update a Service’s detailed information.
- Deactivate – Click the Deactivate button on any active Service / Special to remove it as a selection when you create work orders. (It will not be deleted from the LifeSaver software and it will still be active in any Work Orders that have it.) To make a deactivated Service / Special available again, first click Show Deactivated Services, then click the Activate button on the desired item.
The Special Details Page
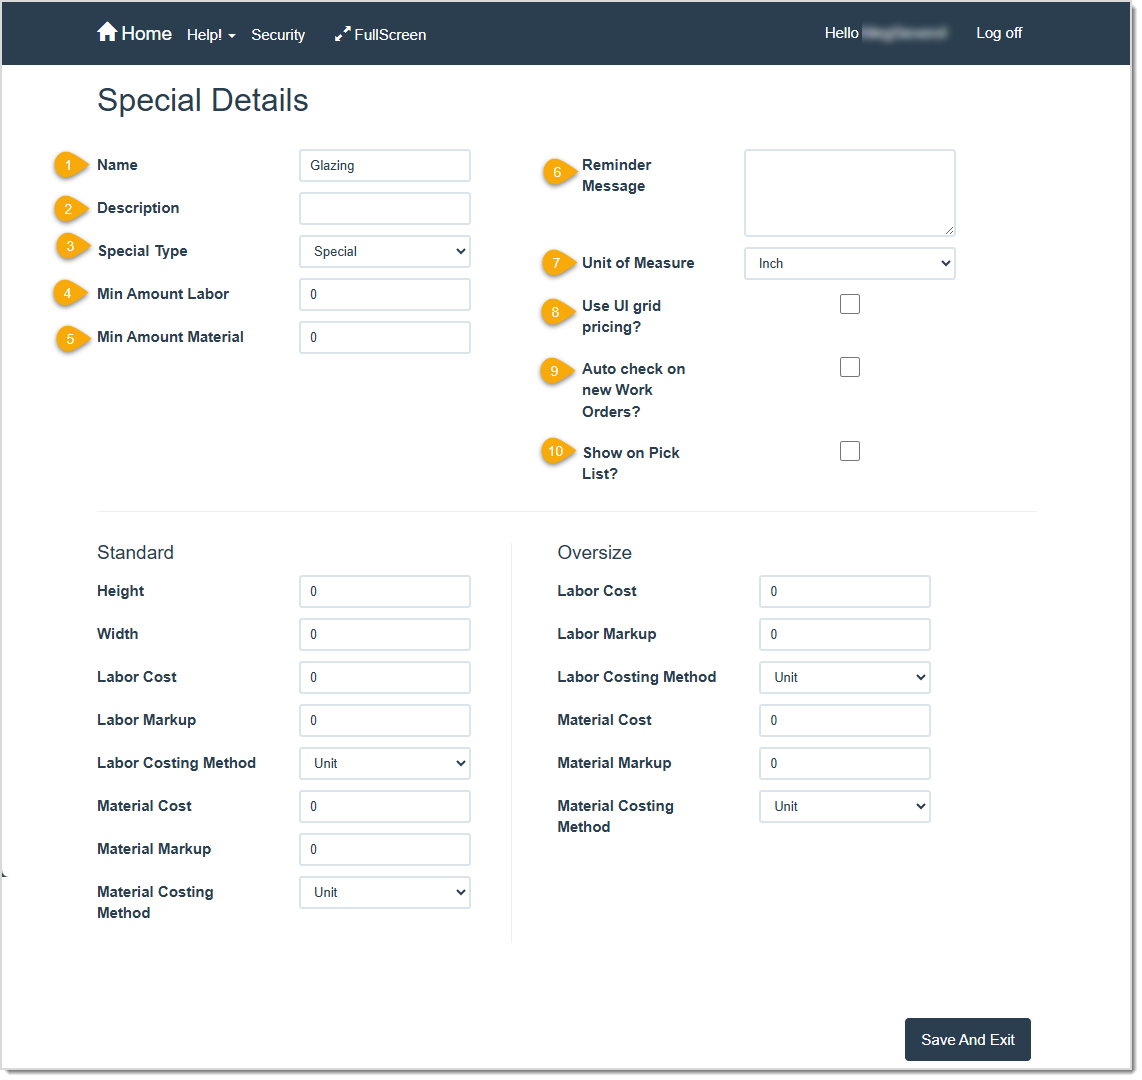
Pro Tip: At a minimum, enter a name for your Service (Special). All other fields are optional. Keep in mind, though, that the more information you provide here, the more helpful it will be when you create work orders.
- Name – This field shows the name of the Service you are editing. If you are creating a new Service, enter a name for it here. This name appears when you select Services (specials) at the bottom of a work order.
- Description – This field shows a description of the Service option. This helps clarify the purpose of the Service when you or your team select it later. If this is a new Service, enter a description of it here.
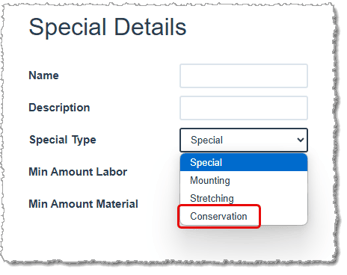
- Special Type – This field shows the type of special this is. LifeSaver Software uses this category to group Services on work orders. If this is a new Service, select the category type for it here. By default, Special is selected as the type for any new Service / Special.
- Min Amount Labor – This field shows the flat labor fee to charge when the conditions defined in Standard are not met. If this is a new Service, enter the minimum amount to charge for labor here.
- Min Amount Material – This field shows the flat material fee to charge when the conditions defined in Standard are not met. If this is a new Service, enter the minimum amount to charge for materials here.
- Reminder Message – This field shows any messages that will pop up when you select the Service on a work order. If this is a new Service, you can enter an optional message here for your sales team.
- Unit of Measure – This field determines the default unit of measure, such as inches or centimeters, to use for this Service (special).
- Use UI Grid Pricing – This check box determines if you use Standard / Oversize pricing or United Inch pricing for the Service. Check it to use UI grid pricing. This removes the Standard and Oversize areas on the page and replaces them with columns and boxes that you can use to enter United Inch size ranges and fees to price the Service.
- Auto-Check on New Work Orders – When checked, this Service is automatically added on all new work orders. You can deselect it on individual work orders if it doesn’t apply.
- Show on Pick List – When checked, this Service is automatically added to the Pick List (accessible from the Home page) whenever it appears on a work order.
Standard Options
This column determines pricing for the Service on a work order. When the size of the work order exceeds the height and width entered here, the work order uses the Oversize column.
- Height – This field shows the maximum standard height for this Service (special) using the measurement value selected above. For a new Service, enter the largest height measurement to consider before using Oversize measurements.
- Width – This field shows the maximum standard width for this Service (special) using the measurement value selected above. For a new Service, enter the largest width measurement to consider before using Oversize measurements.
- Labor Cost – This field shows the fee you will charge for labor when this Service (special) is added to a work order and the work order meets the Standard size requirements. For a new Service, enter the flat fee you want to charge for labor for this Service.
- Labor Markup – This field shows the amount of markup to apply to the labor cost on the Service. Markup is a multiplier of Cost. For example, if the Cost is 5 and your Markup is 1, your Retail will be 5. But if your Markup is 3, your Retail will be 15. For a new Service, enter the amount of markup you want to apply to the labor cost.
- Labor Costing Method – This is the default method to use to calculate and track your labor costs for this Service. Choose Unit to charge a flat amount, or select a measurement-based method (such as United Inch or Square Inch) to calculate costing based on the size.
- Material Cost – This field shows the fee you will charge for the materials when this Service (special) is added to a work order and the work order meets the Standard size requirements. For a new Service, enter the flat fee you want to charge for the material used for this Service.
- Material Markup – This field shows the amount of markup to apply to the material cost on the Service. Markup is a multiplier of Cost. For example, if the Cost is 5 and your Markup is 1, your Retail will be 5. But if your Markup is 3, your Retail will be 15.
- Material Costing Method – This is the default method to use to calculate and track your material costs for this Service. Choose Unit to charge a flat amount, or select a measurement-based method (such as United Inch or Square Inch) to calculate costing based on the size.
Oversize Options
This column determines pricing for this Service when the size of the work order is greater than the height and width entered in the Standard column.
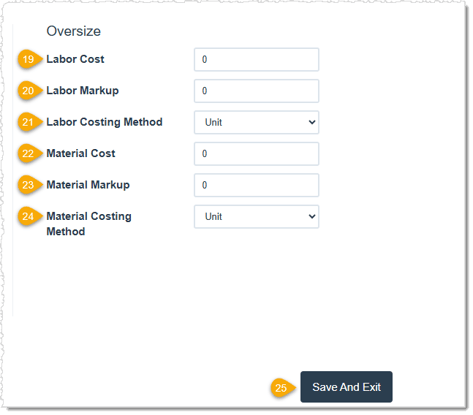
- Labor Cost – This field shows the fee you will charge for labor when this Service (Special) is added to a work order and the work order exceeds the Standard size requirements. For a new Service, enter the flat fee you want to charge for labor for this Service.
- Labor Markup – This field shows the amount of markup to apply to the labor cost on the Service. Markup is a multiplier of Cost. For example, if the Cost is 5 and your Markup is 1, your Retail will be 5. But if your Markup is 3, your Retail will be 15. For a new Service, enter the amount of markup you want to apply to the labor cost.
- Labor Costing Method – This is the default method to use to calculate and track your labor costs for this Service. Choose Unit to charge a flat amount, or select a measurement-based method (such as United Inch or Square Inch) to calculate costing based on the size.
- Material Cost – This field shows the fee you will charge for the materials when this Service (special) is added to a work order and the work order exceeds the Standard size requirements. For a new Service, enter the flat fee you want to charge for the material used for this Service.
- Material Markup – This field shows the amount of markup to apply to the material cost on the Service. Markup is a multiplier of Cost. For example, if the Cost is 5 and your Markup is 1, your Retail will be 5. But if your Markup is 3, your Retail will be 15.
- Material Costing Method – This is the default method to use to calculate and track your material costs for this Service. Choose Unit to charge a flat amount, or select a measurement-based method (such as United Inch or Square Inch) to calculate costing based on the size.
The Fitting Page
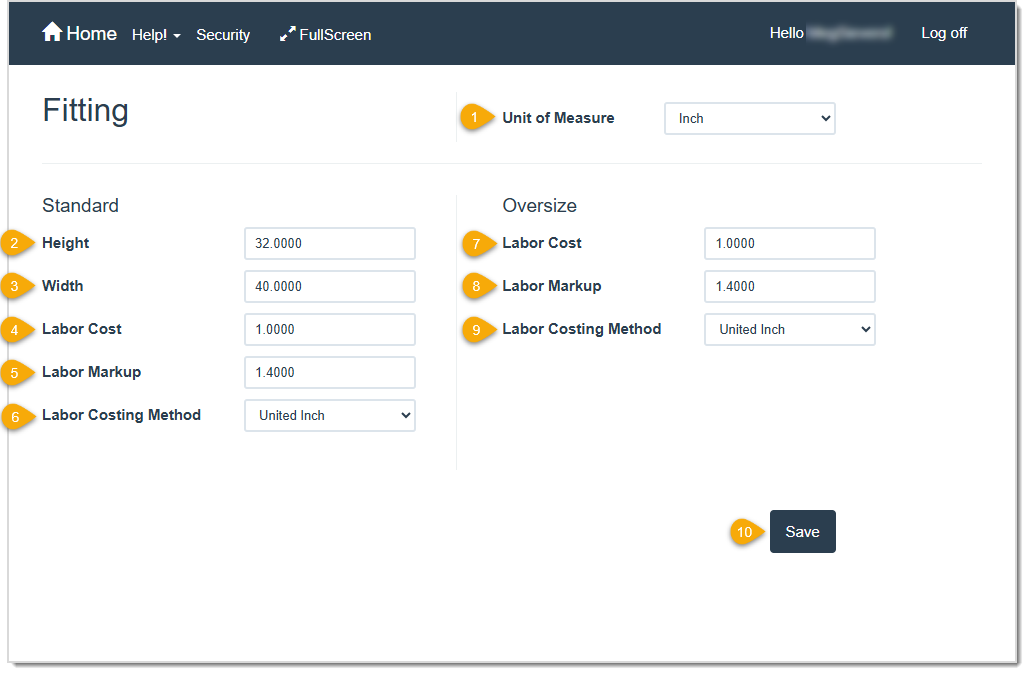
Fitting Fees cover the labor involved in preparing and assembling artwork into its frame. These tasks may include cleaning the glass, sealing the frame, or installing hanging hardware. Unlike labor fees, which apply to more extensive or specialized work (like mounting or stretching), Fitting Fees apply to basic assembly and preparation.
Use this page to manage the costs and markups for Fitting Fees on work orders. LifeSaver Software applies these values when you enable Use Default Fitting Charge in your store configuration. These Fitting Fees apply globally to all Services (Specials) and do not vary by individual Service.
- Unit of Measure – Select the default unit of measure from the drop-list (such as inches or centimeters) to use for calculating Fitting Fees on a work order.
- Height – Enter the maximum height that qualifies a work order for Standard Fitting Fees.
- Width – Enter the maximum width that qualifies a work order for Standard Fitting Fees.
- Labor Cost – Enter the labor fee to charge when the work order dimensions fall within the Standard range and a fitting charge applies.
- Labor Markup – Enter the markup multiplier to apply to the labor cost. For example, if the cost is 5 and the markup is 1, the retail price will be 5. If the markup is 3, the retail price will be 15.
- Labor Costing Method – Select the default method to calculate and track labor costs. Choose Unit to charge a flat amount, or select a measurement-based method (such as United Inch or Square Inch) to calculate costs based on size.
- Labor Cost – Enter the labor fee to charge when the work order dimensions exceed the Standard range and a fitting charge applies.
- Labor Markup – Enter the markup multiplier to apply to the labor cost. For example, if the cost is 5 and the markup is 1, the retail price will be 5. If the markup is 3, the retail price will be 15.
- Labor Costing Method – Select the default method to calculate and track labor costs. Choose Unit to charge a flat amount, or select a measurement-based method (such as United Inch or Square Inch) to calculate costs based on size.
- Save – Click this button to save your changes to the fitting settings.
The Service Types Page

Service Types help you categorize your Services (Specials). By default, LifeSaver Software includes types for Mounting, Stretching, and Special (labor), but you can add as many additional types as your business requires. On this page, you can activate or deactivate Service Types and create new ones.
To access this feature, click the Create Service Type button on the Services page.
- Name – This column shows you the name of each of your Service Types.
- Deactivate – Click the Deactivate button on any active Service Type to remove it from the list of available options when you create work orders. (LifeSaver Software does not delete it from the software.) To make a deactivated Service Type available again, click the Activate button on the desired item.
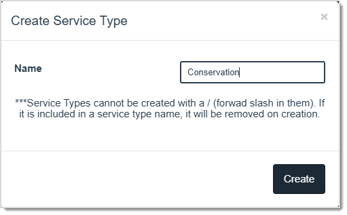
- Create New Service Type – Click this button to open the Create Service Type window. Then, enter a Name for your new type and click the Create button to add it as an option when you create new Services (Specials).
Your new type will be available in the Special Type drop-list, shown below, when you create a new Service.
It will also be used on the Work Order page to categorize your Service (Special) offerings.
Adding Services (Specials) to a Work Order
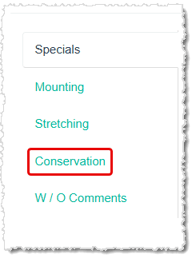
To get started, click the Write Work Order button on the Home page to open the Work Order page. You can add Services (Specials) from the bottom of the Work Order page. LifeSaver Software includes three default Service (Special) Types: Specials, Mounting, and Stretching. In the example image below, you can also see a custom Service Type called Conservation.
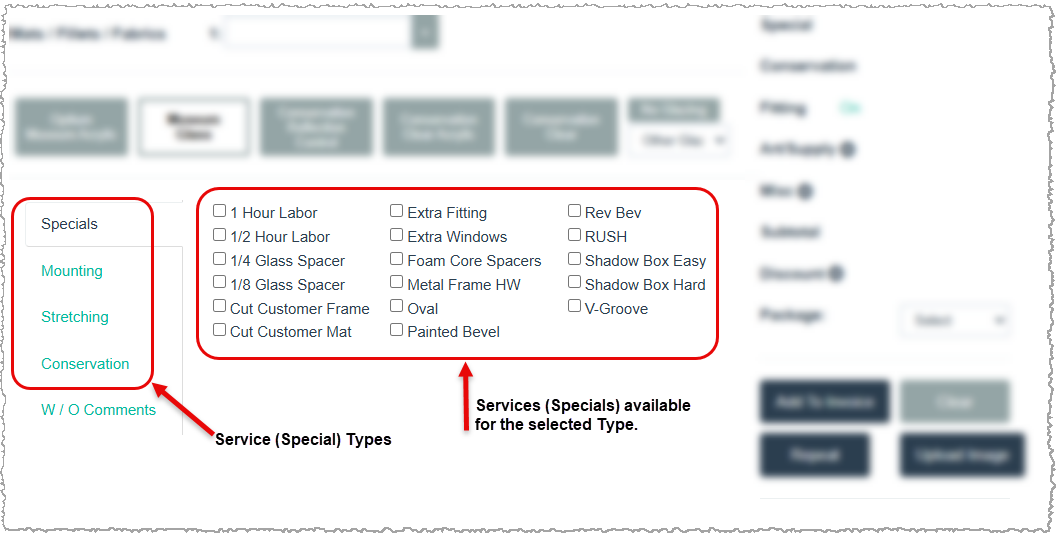
When you click a Service Type, LifeSaver Software displays all Services (Specials) associated with that type on the right side of the page. In the example image above, the system shows Services set up under the Specials type, such as 1 Hour Labor, ½ Hour Labor, and others.
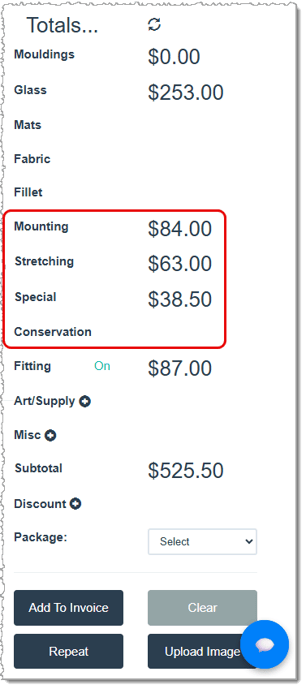
LifeSaver Software automatically adds the pricing for any selected Services (Specials) to the Totals column. In the example image below, selections were made from the Mounting, Stretching, and Specials types. The dollar amounts reflect your pricing settings for each selected Service (Special) and the measurement details entered for the specific work order project.
Fitting Fees and Work Orders
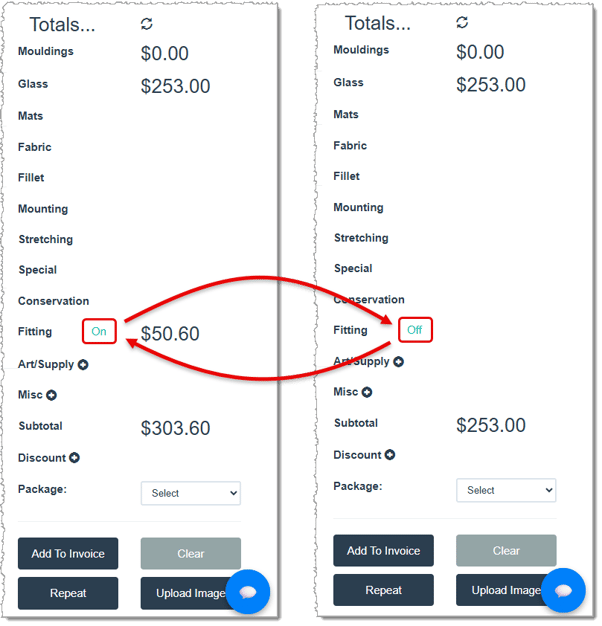
On your work orders, you will see a Fitting option in the Totals column on the right side of the page when you enable the Use Default Fitting Charge option in your store configuration. If you do not want to apply a fitting fee to the work order, click the blue “On” text to toggle it off. You can click it again at any time to reapply the fitting fees.
Related Topics
Working with Work Orders
Store Configuration - Settings
Frequently Asked Questions
Q: Can I edit a Service Special after I create it?
A: Yes. Click the Details button beside the Service on the Services page, make your changes on the Special Details page, and click Save.
Q: How do I remove a Service Special if I no longer use it?
A: Click the Deactivate button next to the Service on the Services page. You can reactivate it at any time by clicking the Show Deactivated option and then the Activate button.
Q: Can I edit a Service if active orders already use it?
A: Yes. Existing orders won’t change price, but new orders will use your updated Service (Special).
Q: What if I can’t find my Service (Special)?
A: Make sure you are on the Services page, and that the Service (Special) wasn’t previously deactivated. If it was deactivated, click the Show Deactivated Services option, then click the Activate button for the Service before editing.
Q: What if I only want to change the name?
A: Navigate to the Details panel, remove the old name, and type the updated one. Make sure to click Save.
Q: I have a question, but I can't find my answer here, how do I get more assistance?
A: You can ask any question at the link below, once received one of our technicians will be in touch! If you need immediate assistance, the LifeSaver Software team is available Monday through Friday, from 9:00am to 6:00pm Eastern time. Feel free to contact our support team at: 1-800-381-0600, extension 2. Or you can email us at support@lifesaversoft.com and we will respond within 24-hours.
 October 10, 2025
Is this page helpful?
×Help us improve our articles