The Glazing page is an essential part of the LifeSaver Software Software that lets you adjust Glazing details to match your store’s cost, size specifications, or preferred markup amounts and provide your customers with accurate pricing. You can also create your own custom Glazing items.
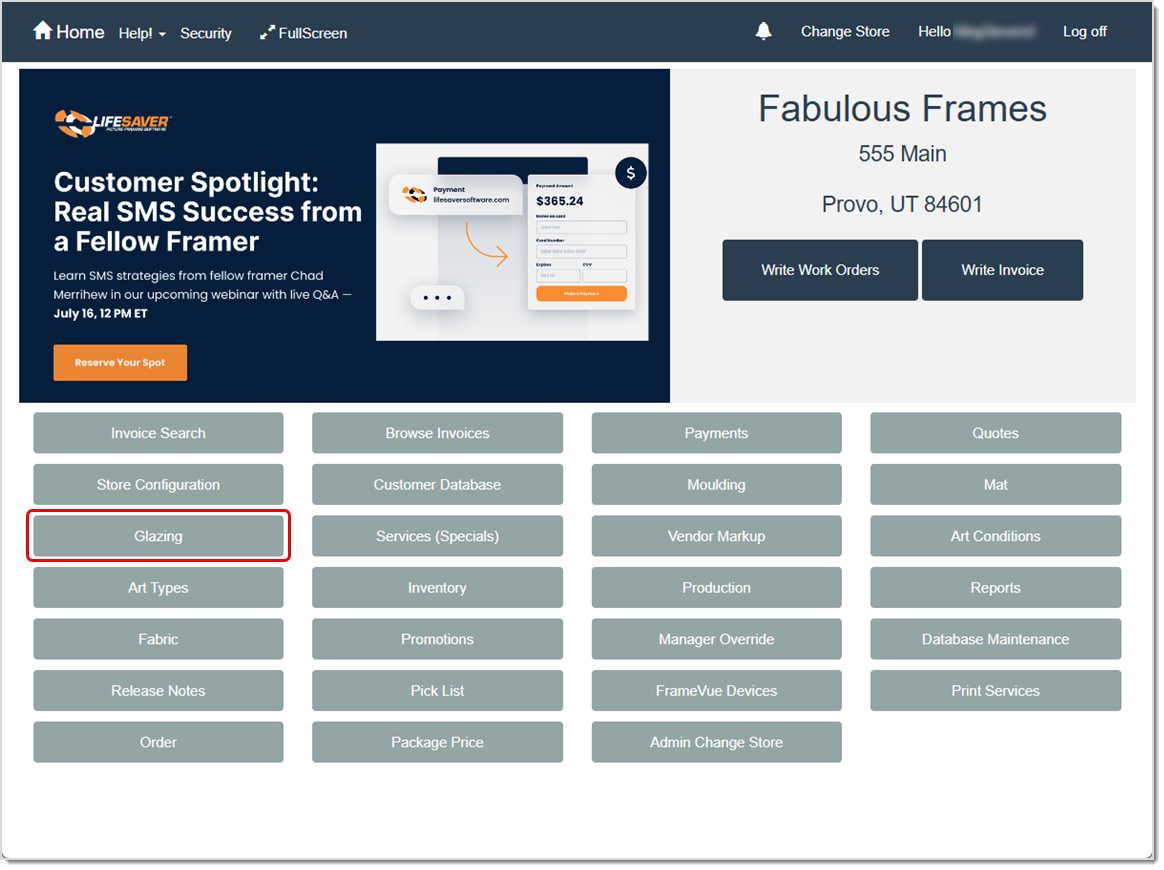
To access this feature, click the Glazing button on your Home page.
Relevant Store Configuration Settings
Several options in your Store Configuration can affect how you use Glazings. Click the Store Configuration button on your Home page to access these settings. On the Settings tab of your store configuration, you will want to review these options:
- Show Glazing On Layer
- Additional Amount Per Glazing
The Glazing Page
To access this feature, click the Glazing button on your Home page.
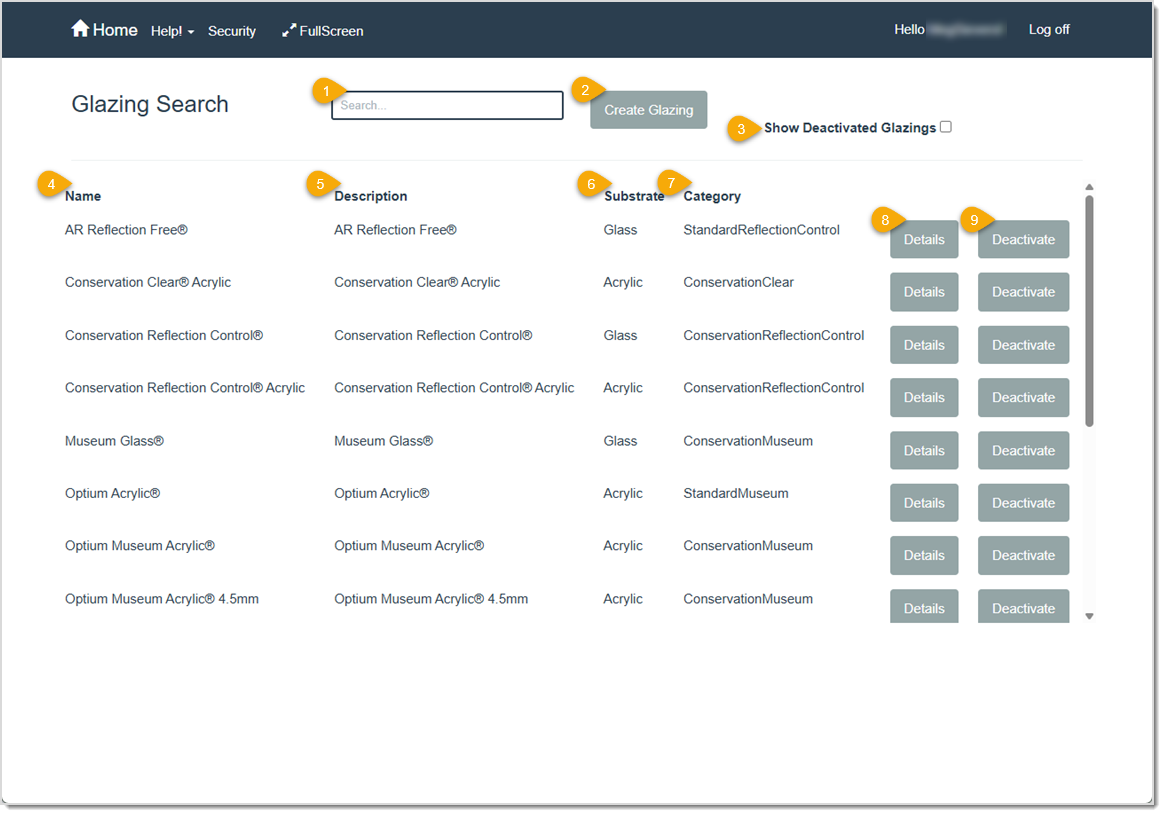
- Search – Begin entering a name, substrate, or other identifying information to search for a specific Glazing. The LifeSaver Software software will automatically start searching for matches as you type. For example, you might start typing “acry” here to find all of the Acrylic options. You can use the vertical scrollbar to navigate to the Glazing you need.
- Create Glazing – Click this button to create a new Glazing option.
- Show Deactivated Glazings – Click this checkbox to include inactive Glazings in your search.
- Name – This column shows the name of each Glazing option.
- Description – This column shows a description of each Glazing option.
- Substrate – This column shows the material of which each Glazing option is made (glass, mirror, or acrylic).
- Category – This column shows the Glazing type, such as conservation or standard.
- Details – Click this button to open the Glazing Details window where you can view the Glazing’s product details and adjust its cost and markup values.
- Deactivate – Click the Deactivate button on any active Glazing to remove it as a selection when you create work orders. (It will not be deleted from the LifeSaver Software software.) To make a deactivated Glazing available again, first click Show Deactivated Glazings, then click the Activate button on the desired item.
The Glazing Details Page
You can work with details about your Glazings and control your store’s markup values for each size offering of your glass, acrylic, and mirror Glazing options. Each Glazing can have more than one Costing Method markup table, but when you add this Glazing to a work order, the values set up as the Default Costing Method will be used. You can adjust your Glazing markup tables at any time without overwriting other costing methods that you do not actively use. For example, if one Glazing is costed by Lite, but another uses Square Inch, you only need to update the relevant tables.
You can access the Glazing details and markups by clicking the Details button on the Glazing window and then selecting the appropriate option in the Costing Method drop-list on the Glazing Details window.
Please Note: TruVue Glazing is built into the LifeSaver Software software but you will need to create the markup tables.
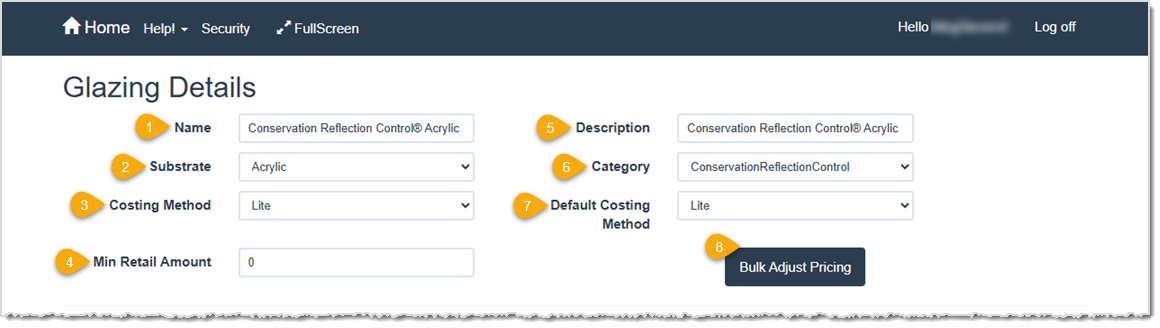
- Name – This field shows the name of the Glazing you are editing. If you are creating a new Glazing, enter a name for it here.
- Substrate – This field shows the type of substrate of the Glazing: Glass, Acrylic, or Mirror. If you are creating a new Glazing, select the appropriate substrate material here.
- Costing Method – This field shows the method selected for determining the cost of producing a frame using the Glazing. Options include: Lite, United Inch, Square Inch, Square Meter, and UI Grid. If you are creating a new Glazing, select a costing method for pricing your Glazing. You may choose to set up more than one costing method per Glazing. When you make a selection here, the table below changes to match the costing method you are creating.
Pro Tip: If your Glazing default method is Lite, you do not need to fill out markup tables for the other methods. Click on the drop-list and edit or add markup rows as needed if you want to switch methods (e.g., from Lite to United Inch).
- Min Retail Amount – This field shows the minimum retail amount to charge for the Glazing. Enter an amount here if you are creating a new Glazing. LifeSaver Software will not price the Glazing below this amount.
- Description – This field shows a description of the Glazing option. If this is a new Glazing, enter a description of it here.
- Category – This field shows the category selected for the Glazing. Options include: ConservationMuseum, ConservationReflectionControl, ConservationClear, StandardMuseum, StandardReflectionControl, StandardClear, and Mirror. For a new Glazing, select an appropriate category.
- Default Costing Method – This field shows the default costing method used for this Glazing option. For a new Glazing, select the default method to use for costing in this field. When writing a work order, the software will calculate the retail price based on the default costing method selected and the corresponding markup table.
- Bulk Adjust Pricing – Click this button open the Bulk Adjust Price window where you can raise or lower the Glazing costs or retail markup values shown in the markup table by a specified percentage. Select the appreciate option, enter a percentage, and click OK to complete the adjustment on the selected Glazing.

Pricing Table Details for Lite, United Inch, Square Inch, and Square Meter
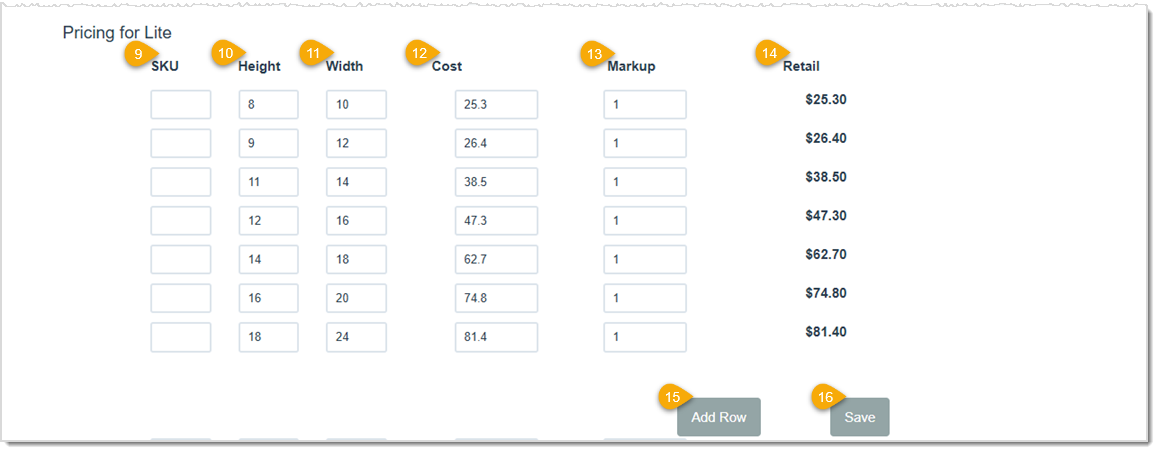
- SKU – This field shows the SKU entered for a Glazing markup. If you want to use a SKU and one is not entered, click in the box and type the SKU. A SKU is not required.
- Height – This field shows the height value of the Glazing. Click in this field to add or change the height value.
- Width – This field shows the width measurement of the Glazing. Click in this field to add or change the width value.
- Cost – This field shows your store cost of this Glazing (the amount your distributor charges you). Click in this field to add or change the cost value.
- Markup – This field shows the amount of markup to apply to the Cost to reach the desired Retail cost. This is a multiplier of the Cost. In other words, if the Cost is $10.00 and the Markup is 1, the Retail is also $10.00. But if the Markup is 2, the Retail is $20.00. Click in this field to add or change a markup amount.
- Retail – This field shows the calculated retail value of the Glazing.
- Add Row – Click this button to add a new row to the markup table. Simply clear the values in a row if you need to delete it. Once you click the Save button the row will be removed from the markup table.
- Save – Click this button to save any changes you’ve made to the Glazing’s details.
Pricing Table Details for UI Grid
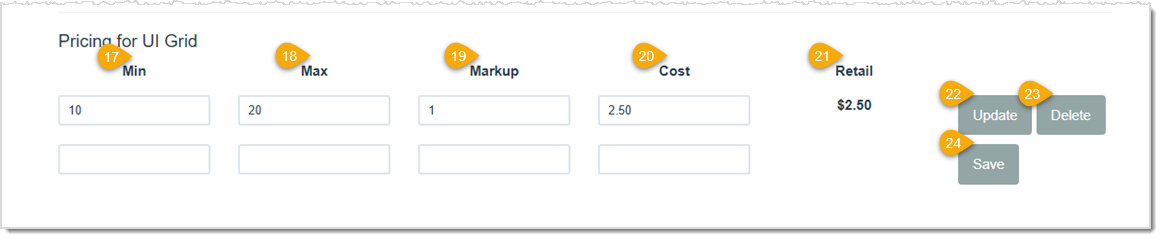
- Min – Enter your Minimum value for the United Inches range for the Glazing.
- Max – Enter the Maximum value for the United Inches range for the Glazing.
- Markup – The Markup is the multiple of the Cost value for the Glazing you would normally charge. So in the example above, if we change the Markup to 4, multiplied by the Cost of $2.50, would result in a Retail price of $10.00, which would meet our Minimum selling price.
- Cost – Enter the Cost you pay for the Glazing.
- Retail – The system will calculate the Retail selling price based on the Markup multiplier and the Cost.
- Update – Click the Update button to apply the values you’ve entered into the UI Grid to the Markup Pricing for your Glazings.
- Delete – Click the Delete button to clear the data in the UI Grid.
- Save – Click the Save button to finalize saving your pricing updates.
Add a Glazing to a Work Order
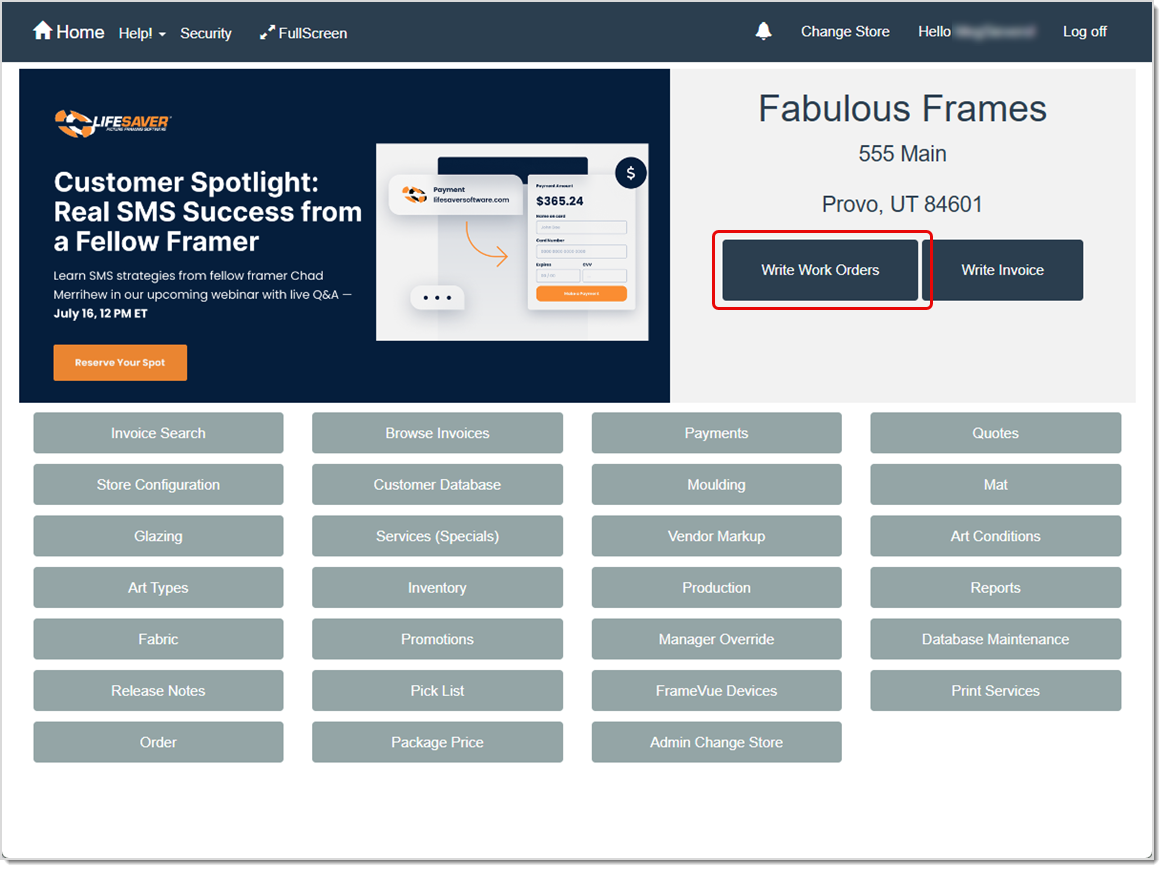
You can add any of your Glazings to a work order in just a few steps from the Work Order page. To get to this area, click the Write Work Orders button on the Home page.
Once you’ve entered a Description and Image Size, you can start working on other components of the work order, such as the mouldings, mats, and glazings.
- On the Home page, click the Write Orders button and the Work Order page will open.
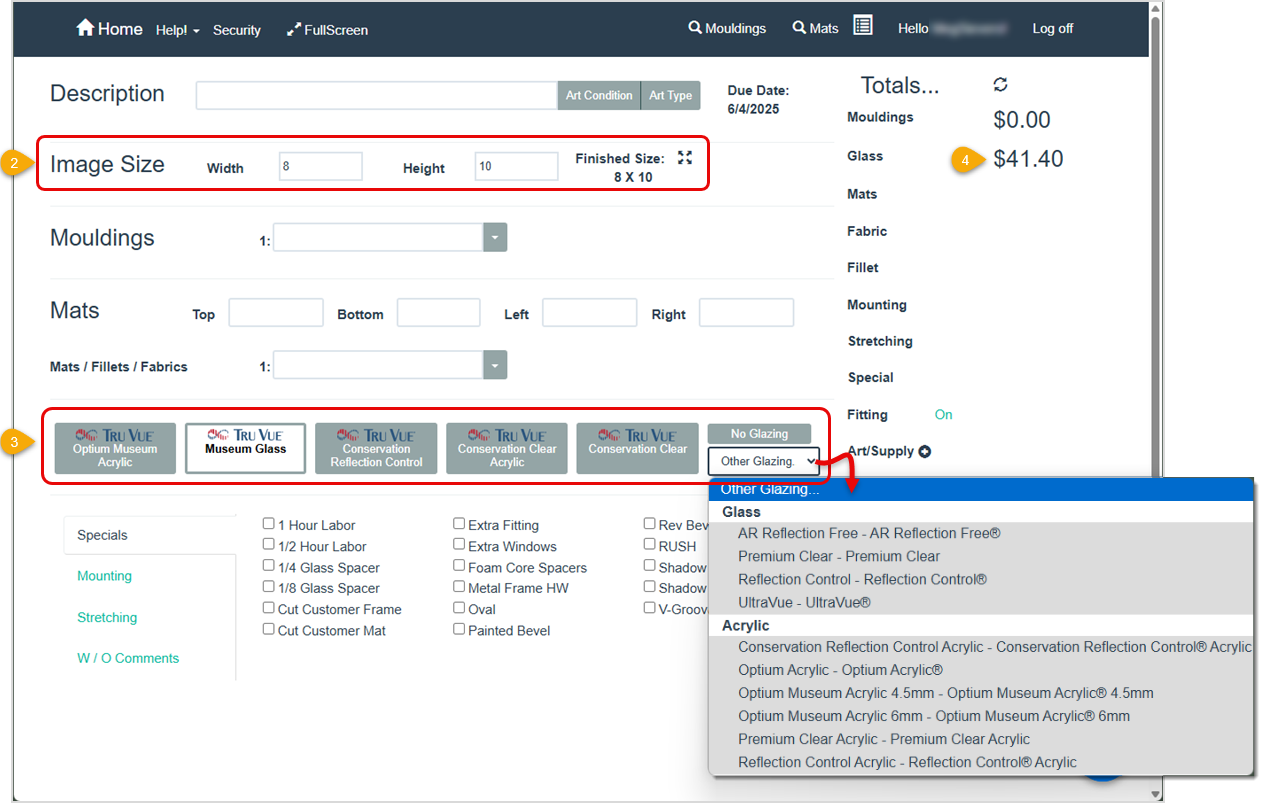
- At a minimum, enter the dimensions of your project in the Image Size fields for Width and Height. You can also click the Finished Size icon and enter those dimensions.
- Select your Glazing for the project.
- Choose one of LifeSaver Software’s standard Tru Vue Glazing options.
- Or, for a custom Glazing, click the Other Glazing drop-list under the No Glazing option to make your selection.
- The system will calculate the Glazing price according to the default Costing Method you set for it. If you want to change the Glazing Type, click the button for that type. The charge will update in the Totals column. Verify that the Glazing options and prices are as expected.
- After you enter your moulding(s), select Glazing on Layer from the Moulding drop-list to indicate where on the project the glazing should be placed. (shown in the image below) For example, you have two layers of moulding and the Glazing should be placed next to your inside moulding. In this scenario, you click the drop-list for Moulding 2 and select Glazing on Layer. This lets your assembler know where to place it when working on the work order.

Related Topics
Working With Vendors
Working With Work Orders
Store Configuration - Settings
Frequently Asked Questions
Q: What if I only see one row in my markup table?
A: You can edit that single row with the appropriate cost and markup. If you need more complexity, click the Add Row button to include additional size ranges.
Q: How do I deactivate or reactivate a Glazing?
A: In the Glazing list, click the Deactivate button on the desired item. To show deactivated Glazings, click the Show Deactivated Glazing option in the upper right. You can reactivate it by clicking Activate.
Q: Why can’t I see my newly edited Glazing prices on a work order?
A: You might need to set the Default Costing Method or verify that you saved your markup changes. Also, confirm the correct Glazing is selected on the work order.
Q: Can I charge a minimum price even if the calculated retail amount is lower?
A: Yes. Enter a Minimum Retail Amount in the Glazing Details screen. LifeSaver Software will not price the Glazing below your minimum.
Q: How do I avoid overwriting existing markup rows for other costing methods?
A: Only edit the relevant costing method table. LifeSaver Software keeps them separate, so changing Lite-based rows won’t affect your Square Inch markup, etc.
Q: I have a question, but I can't find my answer here, how do I get more assistance?
A: You can ask any question at the link below, once received one of our technicians will be in touch! If you need immediate assistance, the LifeSaver Software team is available Monday through Friday, from 9:00am to 6:00pm Eastern time. Feel free to contact our support team at: 1-800-381-0600, extension 2. Or you can email us at support@lifesaversoft.com and we will respond within 24-hours.
 August 26, 2025
Is this page helpful?
×Help us improve our articles