The Mats page is an essential part of the LifeSaver Software software that lets you view Mat details and create your in-stock store inventory of Mat supplies. You can control your store’s cost, size specifications, or preferred markup amounts to provide your customers with accurate pricing.
Pro Tip: The LifeSaver Software software automatically updates Mat product and price changes for you for any vendor you have selected to use. You will never need to update these yourself. However, if you have created in-store stock based on any of these products, you will need to periodically view the details of the original vendor item and compare them to your store stock making updates to your store stock as necessary.
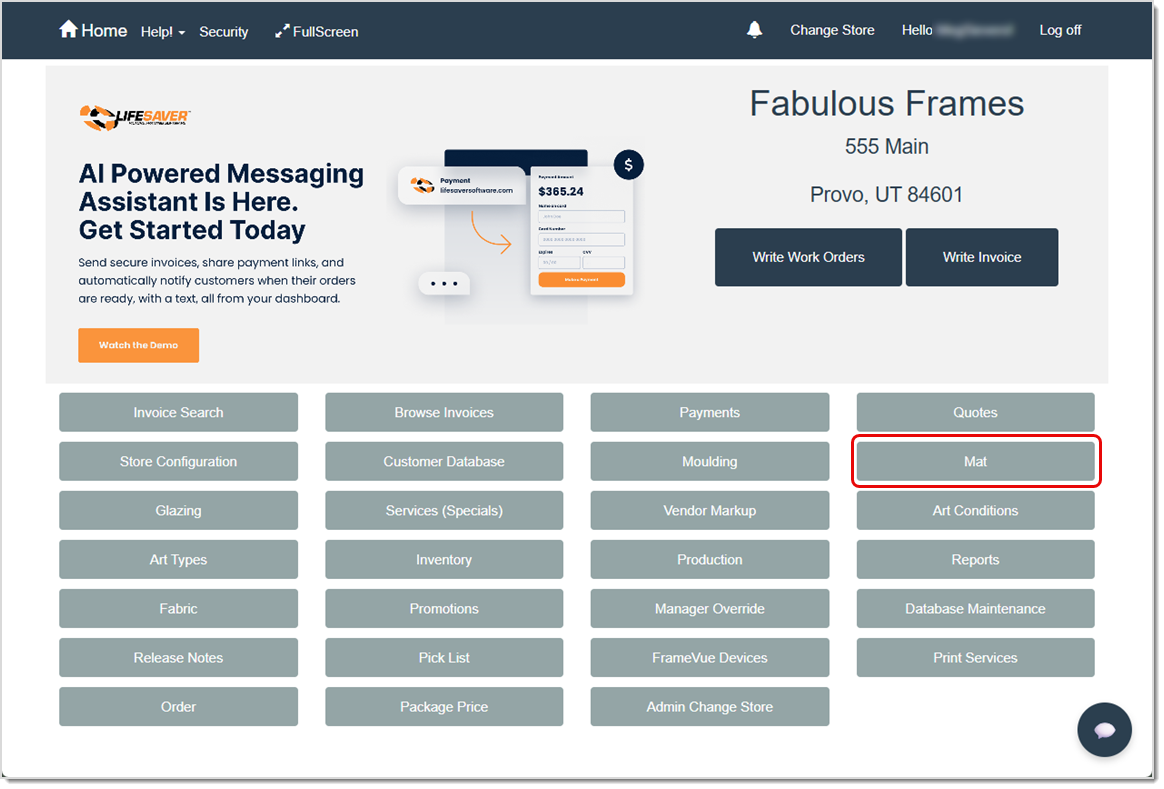
To access this feature, click the Mat button on your Home page.
Relevant Store Configuration Settings
A variety of options in your Store Configuration can affect how you use Mats. Click the Store Configuration button on your Home page to access these settings. On the Settings tab of your store configuration, you will want to review these options:
- Unit of Measurement
- Default Mat Costing Method
- Top Border, Bottom Border, Left Border, and Right Border
- Reveal 2nd Mat and Reveal 3rd(+) Mat
- Use Add Reveal
- Additional Amount Per Mat
- Additional Mat Charge Per Work Order
- Minimum Mat Price is X Times Cost
In addition to the Settings tab in Store Configuration, you’ll want to look at the Mat Cutter tab and select either the Valiani Mat Cutter or the Wizard Mat Cutter, if applicable. Your selection here helps the LifeSaver Software software use computerized cuts. If your store does not use these machines for computerized Mat cuts, you can ignore that tab.
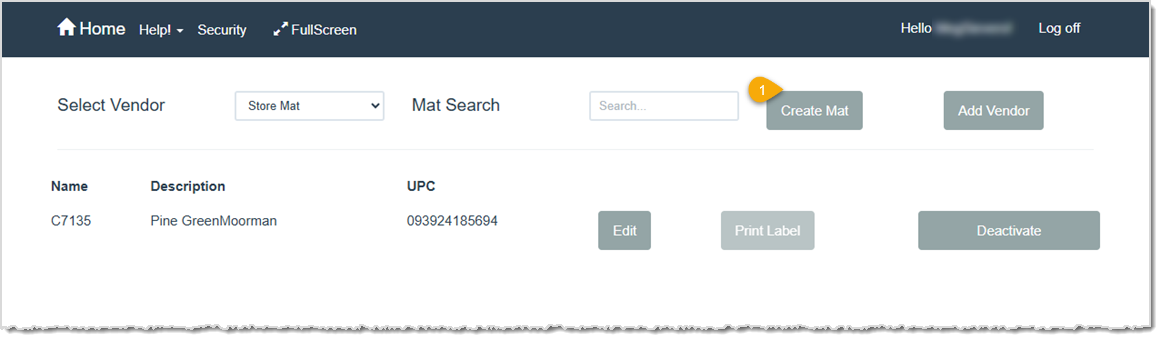
The Mat Page
You can view the details of your Mat supplies by the vendor who supplies them on this page. You can also create and edit in-store stock Mats, print labels for your Mats, deactivate or reactivate your store Mats, and even add vendors from here.
Click the Mat button on your Home page to access this page.

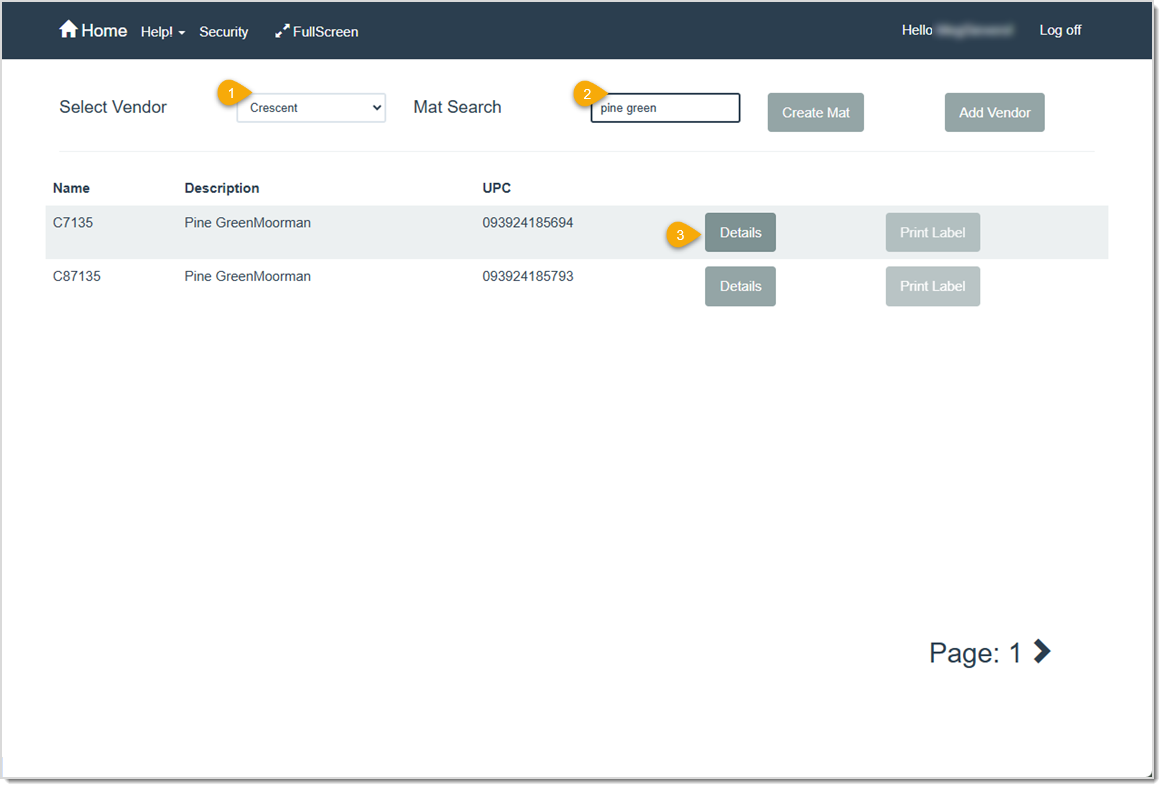
- Select Vendor – Select the vendor for which you want to view Mats. Vendors are pre-loaded into your LifeSaver Software software. Vendors are pre-loaded into your LifeSaver Software software. Once selected from the drop-list, all of that vendor’s Mat inventory will load. You can use the vertical scrollbar and page arrows (in the bottom-right corner) to navigate to the Mat you are looking for.
- Mat Search – To search for a specific Mat from a vendor, select a vendor in the Select Vendor drop-list and then begin typing the item number, color, width, Mat name, or other identifying information. The LifeSaver Software software will automatically start searching for matches supplied by that vendor as you type. For example, you might select Crescent from the drop-list and then start typing “green” in the Mat Search field to find all of the green Mat options offered by Crescent. You can use the vertical scrollbar and page arrows to navigate to the Mat you are looking for or you can enter more specific details in the Mat Search field to reduce the number of results found.
Pro Tip: You must type search criteria that Matches the order of the text in the Name or Description column. For example, if you want to find “Pine GreenMoorman”, you cannot type “green pine” and get any results. You must type “pine green” or another variant of the full Mat description.
- Create Mat – Click this button to open the Create / Edit Store Mat page where you can add a new Mat for your store stock. Unlike Mats listed by vendor, Store Mats are editable, so you can set all attributes of the new Mat.
- Add Vendor – Click this button to add a new Mat Vendor option to your LifeSaver Software software.This will open the Vendor Search page where you can follow the standard steps to add a vendor in LifeSaver Software.
- Name – This column shows the name of the Mat vendor you selected in the Select Vendor drop-list, above.
- Description – This column shows a brief description of the selected vendor’s Mat offerings.
- UPC – This column shows the 12-digit UPC (Universal Product Code) assigned to the Mat option.
- Details – Click this button to access the Mat Details page where you can view the product details of the Mat, print a label for the Mat, or add the Mat to your in-store stock.
- Print Label – Click this button to print a label for this Mat to your DYMO label printer. The label will include the Mat number, description and barcode.
Please Note: You must install a DYMO label printer to use this feature.
- Page Navigation – Click the forward (>) and back (<) arrows to navigate to the next or previous page of Mats.
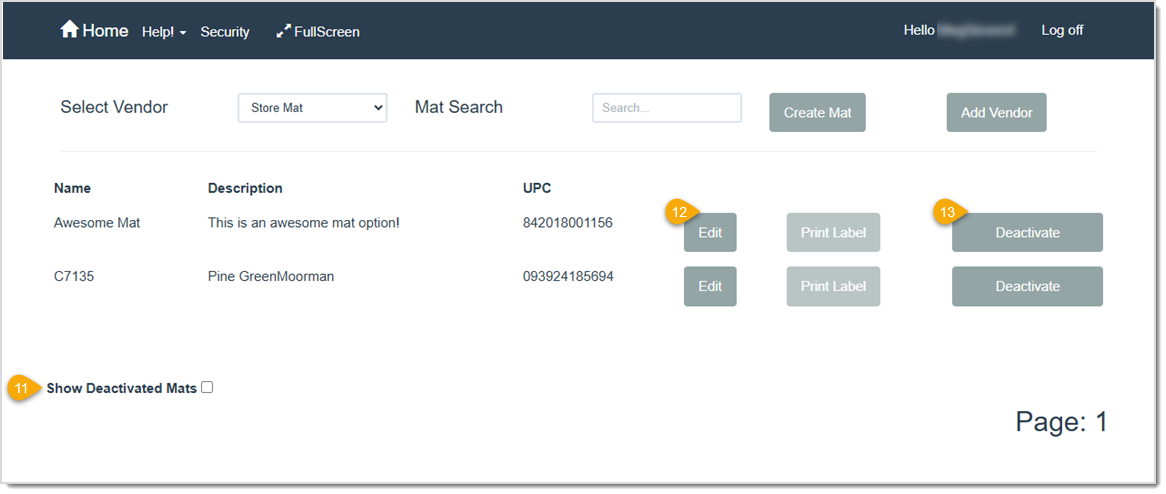
- Show Deactivated Mats – Click this check box to show any Mat options that were previously marked deactivated for this vendor.
- Edit – Click this button to access the Create / Edit Store Mat page where you can print a label for the Mat or edit any details except its vendor.
- Deactivate / Activate – Click the Deactivate button for any active Mat to remove it as a selection when you create work orders. (It will not be deleted from the LifeSaver Software software.) Click the Activate button on any deactivated Mat to make it available to select when you create work orders. (You must click Show Deactivated Mats before you can Activate one.)
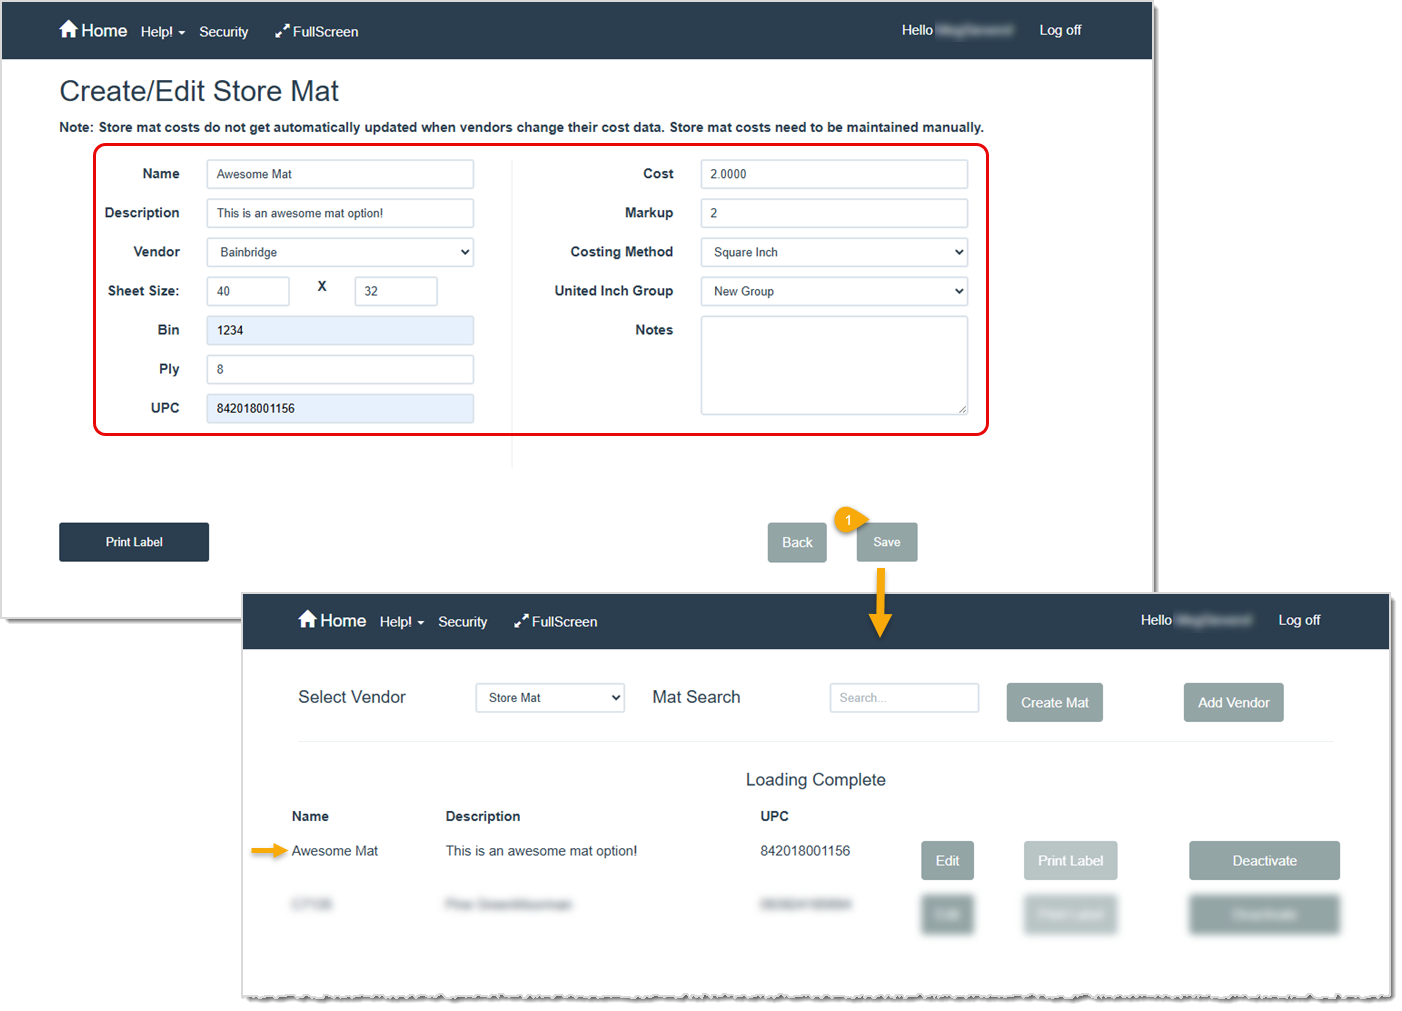
Create / Edit Store Mat Page
You can create or edit a Mat option for your in-store stock on this page. You can create store Mats from scratch by clicking the Create Mat button on the Mat page or you can create store Mats based on vendor supplies by selecting a vendor Mat on the Mat page, clicking the Details button, and then clicking the Create Store Mat button on the Mat Details page that will open.
Pro Tip: You might need to edit a store Mat when a vendor makes price or product updates. These changes are automatically applied for the vendor but not for any store Mats you have created based on the vendor’s product. We recommend that you pull up the original item’s details to observe if any price / product changes have taken place and then edit your corresponding store Mats.
At a minimum, enter a name and description, set the sheet size and ply, select a vendor supplier, and assign costs and markups to your new mouldings.
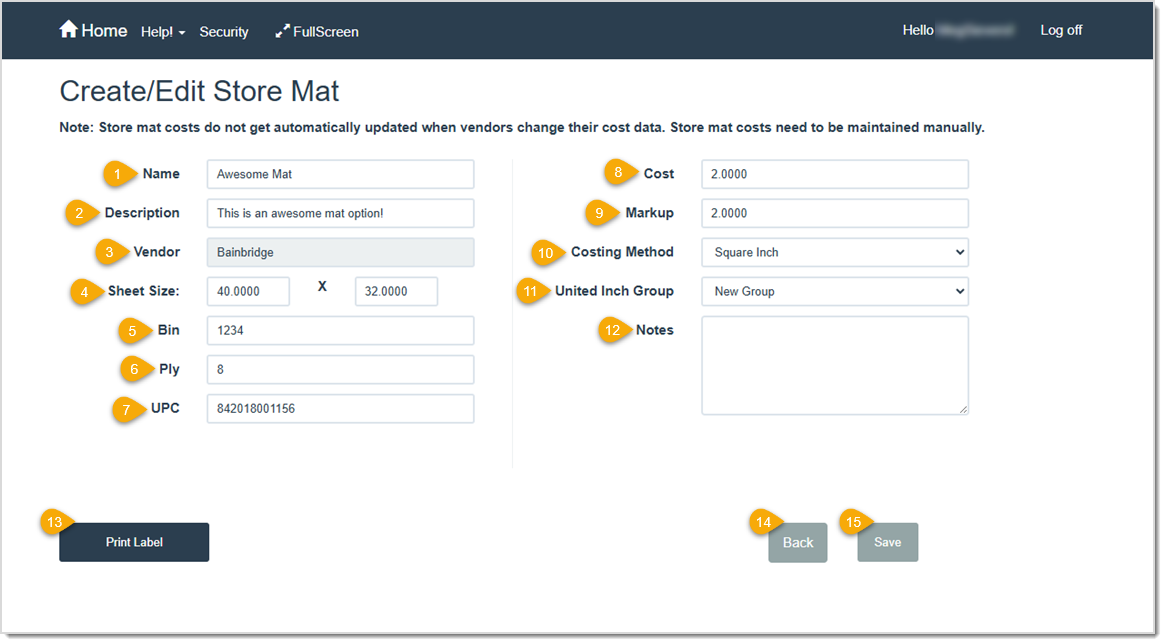
- Name – Enter a name or Mat number for the in-store stock Mat in this field.
- Description – Enter a description for the in-store stock Mat in this field.
- Vendor – Click the drop-list arrow and select the vendor that will supply your in-store stock. Only vendors currently downloaded in your LifeSaver Software software are available to select here. If you are editing a Mat, the Vendor cannot be changed. If you need to add a similar Mat from a different vendor to your store stock, do so by following Option 1 in ANCHOR LINK: Add a Moulding to your Store Stock, above.
- Sheet Size – Enter a width and height dimension of a Mat sheet. Your unit of measurement is set up in Store Configuration.
- Bin – Enter the location in your store where the Mat can be found.
- Ply – Enter the thickness, or ply, of the Mat sheet. For example, a 4-ply sheet is usually about 1/16 inch thick.
- UPC – Enter a UPC (Universal Pricing Code) to use for identifying and tracking this Mat in your store.
- Cost – Enter the amount the vendor charges per sheet of this Mat.
- Markup – Enter a markup amount to apply to your cost when you sell this Mat. (Cost x Markup = Retail Price)
- Print Label – Click this button to print a label for the Mat to your DYMO label printer. The label will include the Mat number, description and barcode.
Please Note: You must install a DYMO label printer to use this feature.
- Back – Click this button to return to the previous page.
- Save – Click this button to save your changes.
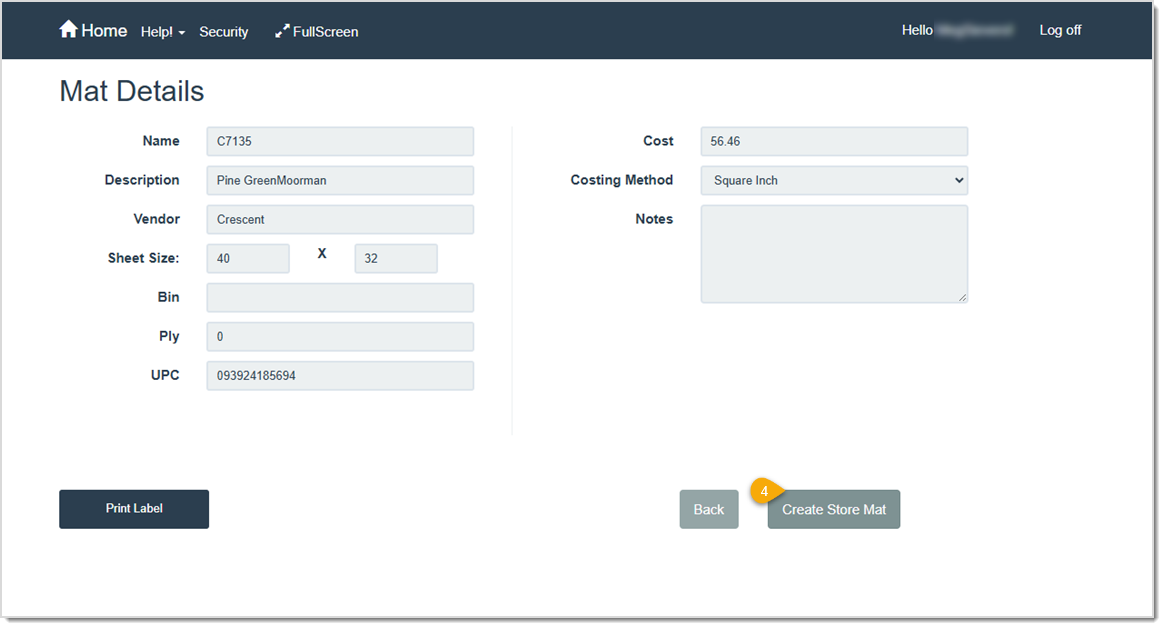
The Mat Details Page
You can view the details of a vendor’s Mat offerings on this page. You might need to do this to verify that the pricing and product details of a Store Mat you created based on this Mat are still accurate. None of the values on this page can be altered, but you can create a new Store Mat based on this Mat.
You can access this page by searching for a vendor Mat on the Mat page and clicking the Details button.

- Name – This field shows the name (or Mat number) of the Mat.
- Description – This field shows a description of the Mat.
- Vendor – This field shows the name of the vendor who supplies the Mat.
- Sheet Size – This field shows the width and height dimensions of the Mat, using your store’s preferred measurement.
- Bin – This field shows your store’s bin location for a store Mat.
- Ply – This field shows the thickness, or ply value, of the Mat.
- UPC – This field shows the Mat’s 12-digit UPC (Universal Product Code).
- Cost – This field shows the amount the vendor charges for a sheet of this Mat.
- Costing Method – This field shows the costing method for Mats. This is set by default in your store configuration.
- Print Label – Click this button to print a label for the Mat on your DYMO label printer. The label will include the Mat number, description and barcode.
Please Note: You must install a DYMO label printer to use this feature.
- Back – Click this button to return to the previous page.
- Create Store Mat – Click this button to turn this vendor Mat offering into store stock on the Create / Edit Store Mat page. You may want to do this if you need an editable version of that Mat, since you won’t be able to edit the Mats listed for your vendors.
Add a Mat to Your Store Stock
Your store Mats are any Mats that you keep in stock for your own use or for customer sales. These may be vendor Mats you’ve copied and customized with your own pricing and details or they might be Mats you create from scratch.
Option 1: Designate a Vendor Mat as a Store Mat
Saving a vendor's Mat creates it as a custom store Mat which allows you to make modifications to it such as to save a bin number or change the cost. When you do this, LifeSaver Software will use the custom Mat’s pricing and details on any work orders you create rather than the vendor’s pricing and details. Additionally, creating a custom Mat from a vendor Mat exempts it from any automatic vendor updates. You will need to manually make any updates to this Mat, such as when a vendor updates their pricing. If you deactivate the store Mat later. LifeSaver Software will resume using the vendor’s pricing and automatic updates.
- On the Mat page, select the Mat vendor from the drop-list.
- Enter a Mat code or other detail in the Mat Search field to find the exact Mat.
- Click the Details button for the Mat you want to add as a Store Mat and the Mat Details page will open.
- Click the Create Store Mat button.

- Make any adjustments to the Mat for your store stock (only the vendor cannot be changed) on the Create / Edit Store Mat page and then click the Save button. The Mat will now be listed on the Mat Search page under the vendor and under the selection Store Mat.
Option 2: Create a Store Mat From Scratch
Creating a fully customized Mat gives you greater flexibility in your offerings. Often, you might use this option when you stock or use Mats from vendors who are not loaded in the LifeSaver Software software or when customers bring in their own Mats. In the latter instance, creating a custom “customer” Mat allows you to still assign and charge labor fees.
- On the Mat Search page, click the Create Mat button and the Create / Edit Store Mat page will open.
- Enter any information relevant to the Mat. At a minimum, give your Mat a name and description, enter dimensions, select a vendor supplier, and assign costs and markups. Each of these is defined in more detail, above: ANCHOR LINK: The Create / Edit Store Mat Page
- When you’re finished entering details for your new Mat, click the Save button. The Mat will now be listed on the Mat page under the vendor selection Store Mat.
Add a Mat to a Work Order
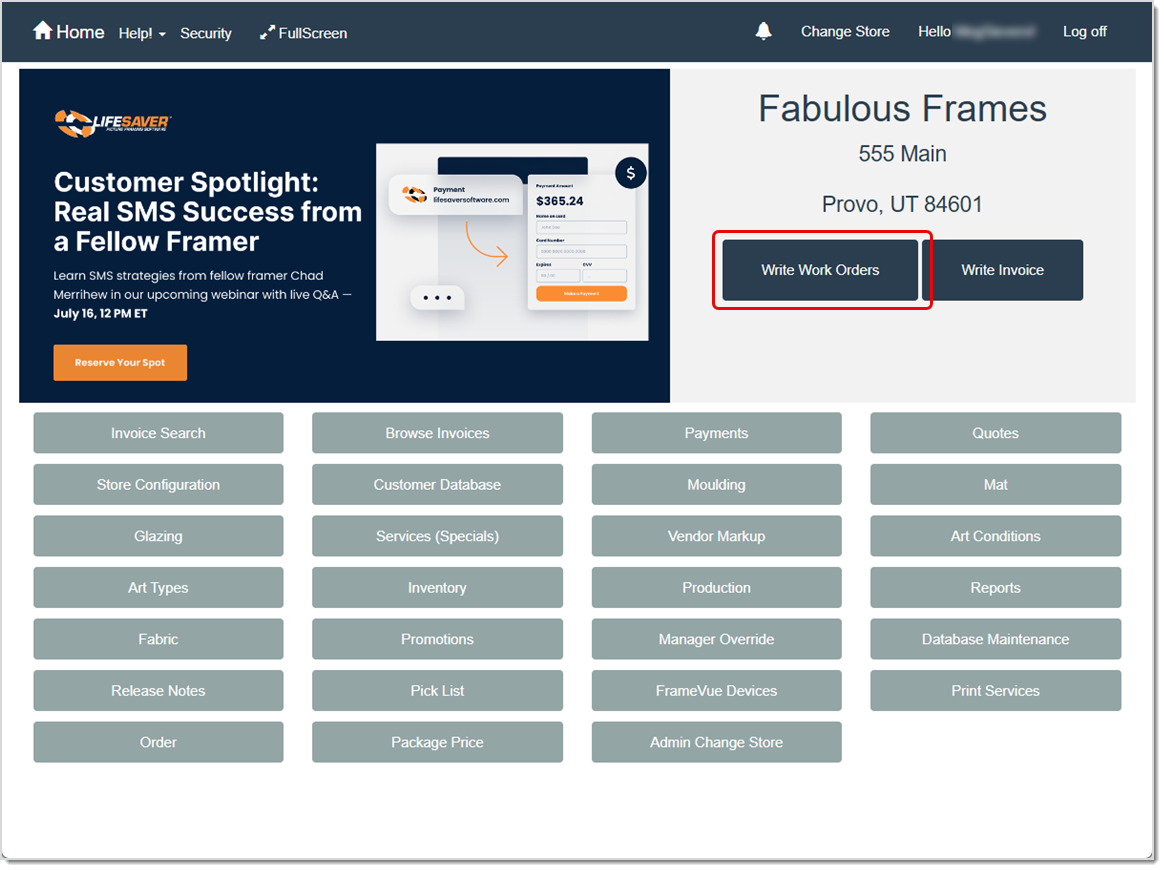
You can add any of your Mat offerings to a work order in just a few steps from the Work Order page. To get to this area, click the Write Work Orders button on the Home page. Enter your Mats, fabrics, and fillets into the work order from the outermost to innermost layer. In other words, enter the item furthest from the art in Mat blank 1. Your Finished Size and Approximate Exterior Dimensions adjust as you add components to the artwork.
Once you’ve entered a Description and Image Size, you can start working on other components of the work order, such as the Mats.
Oversized Mats: If you enter a standard Mat size item code but the work order requires an oversized Mat, LifeSaver Software alerts you with the corresponding oversized Mat item code. It then automatically replaces the current Mat item code with the oversized one.
Jumbo Mats: If your Mat size exceeds 40x60, LifeSaver Software shows an error message. If you know the Mat is available in a jumbo size, click the Close Window (X) to bypass the error. We've asked vendors to include oversized Mat SKUs in their data submissions so we can incorporate them into our program.
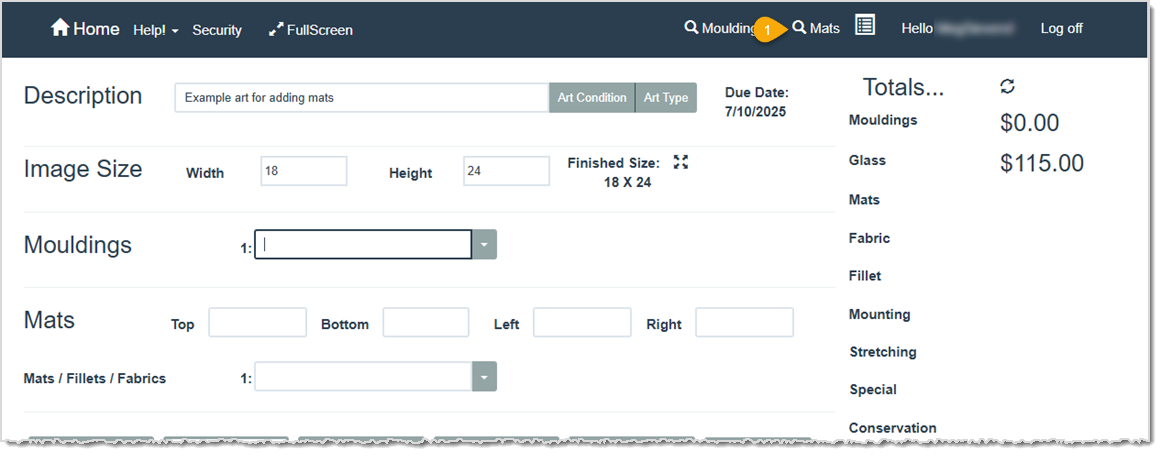
- At the top of the Work Order page, click the Mats link (you’ll find it in the blue menu bar). The Mat Search window will open for you.
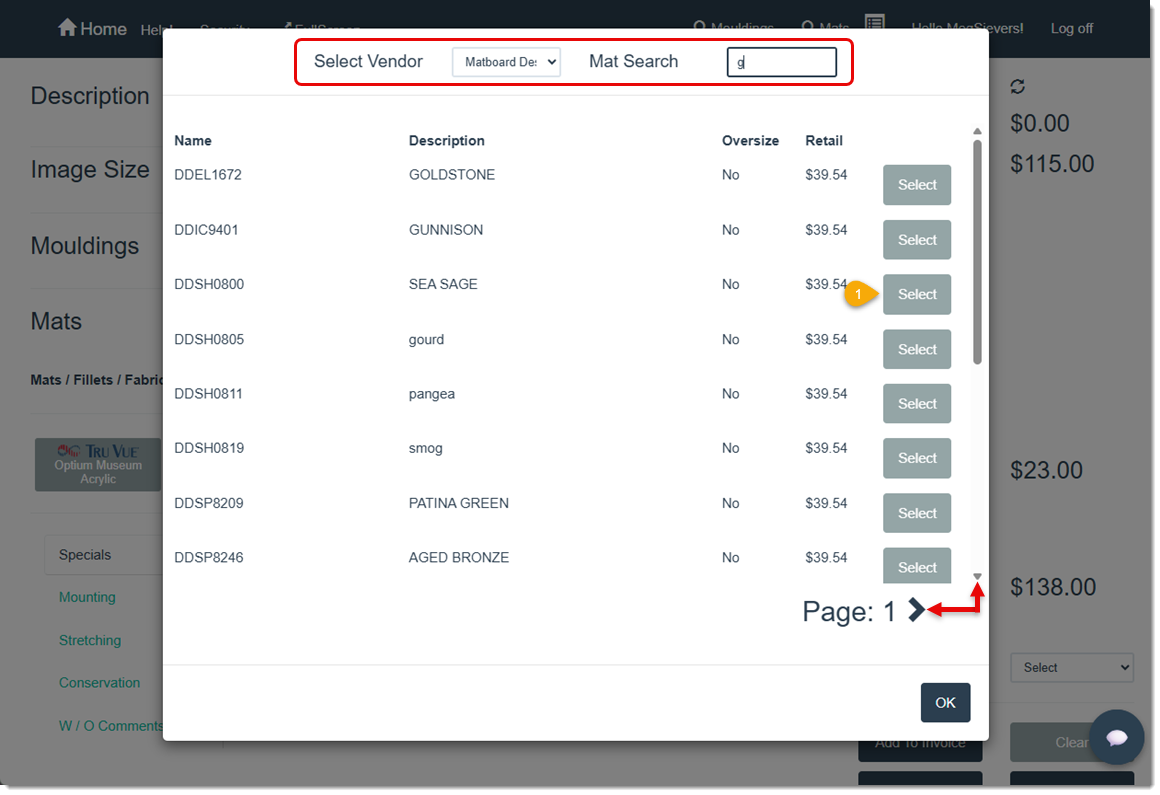
- Select a vendor in the Select Vendor drop-list and, for more specific results, enter a search term in the Mat Search field.
- Use the scrollbar and page arrows to find the Mat you want to use on the work order and then click the Select button. That Mat will be automatically added to the Mat section of the Work Order page and a new Mats 2 option will be added (shown in the image below). If you want to include additional Mats, fillets, or fabrics, click the Mats link at the top of the page and repeat the same steps.
Please Note: Mat 1 must be a mat. Any fillets or fabrics must be added after you have selected Mat 1.
For Fabrics or Fillets: When you add any of these materials, you will add them in the Mat field after the Mat they go on top of. So, for fabrics, you would enter the Mat or substrate you want to wrap the raw fabric on then you add the fabric in the Mat blank after it. If you are wrapping your outermost Mat (Mat blank 1), the fabric would go in Mat blank 2. If you are using a double Mat and the fillet goes inside the inner Mat, your Mats will be in Mat blank 1 and 2 and you will add the fillet in Mat blank 3.

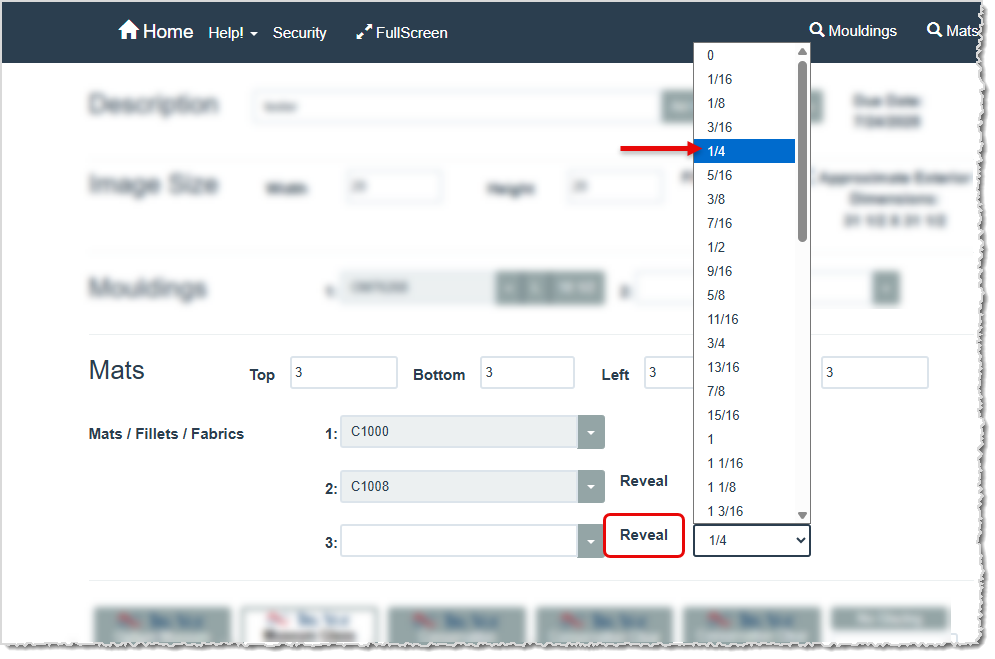
Once you’ve added Mats to a work order, default Mat reveal measurements are automatically added in the Top, Bottom, Left, Right, and Reveal fields based on your store configuration. You can change these as needed. You can also take these additional actions:
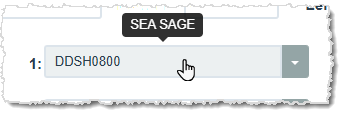
- Hover your cursor over the field to view the description of the Mat.
- Click the drop-list arrow to enter a different product number, delete the Mat from the work order, select a template for your Mat cuts (more information below), add a comment about the Mat (if you select a template, a comment is automatically added), select a standard or reverse bevel cut for the Mat, or indicate if the artwork is meant to be top mounted.
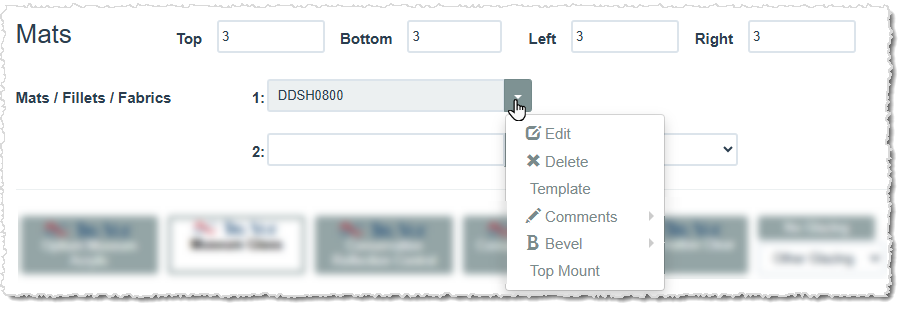
A Note About Bevel: Reverse bevel is automatically selected for you if a fillet is attached to the Mat on the work order.
- Click the drop list arrow to change the size of the reveal. By default this is the measurement established in your Store Configuration. Reveal is available to select on your second or subsequent Mat selections.
Enter Your Mat Cuts
You will want to identify the type of cuts required after selecting your Mat(s) for a work order: will it be a single opening, multiple openings, what are the opening shapes and sizes, and so on.
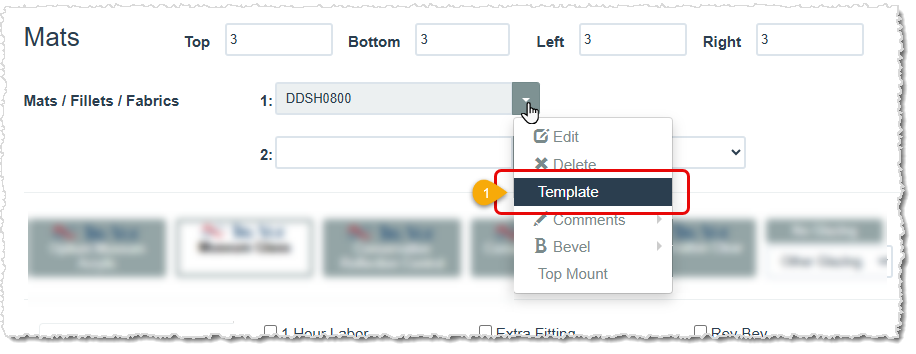
- To do this, click the drop-list arrow next to your Mat and select Template to open the Select Template pop-up window.
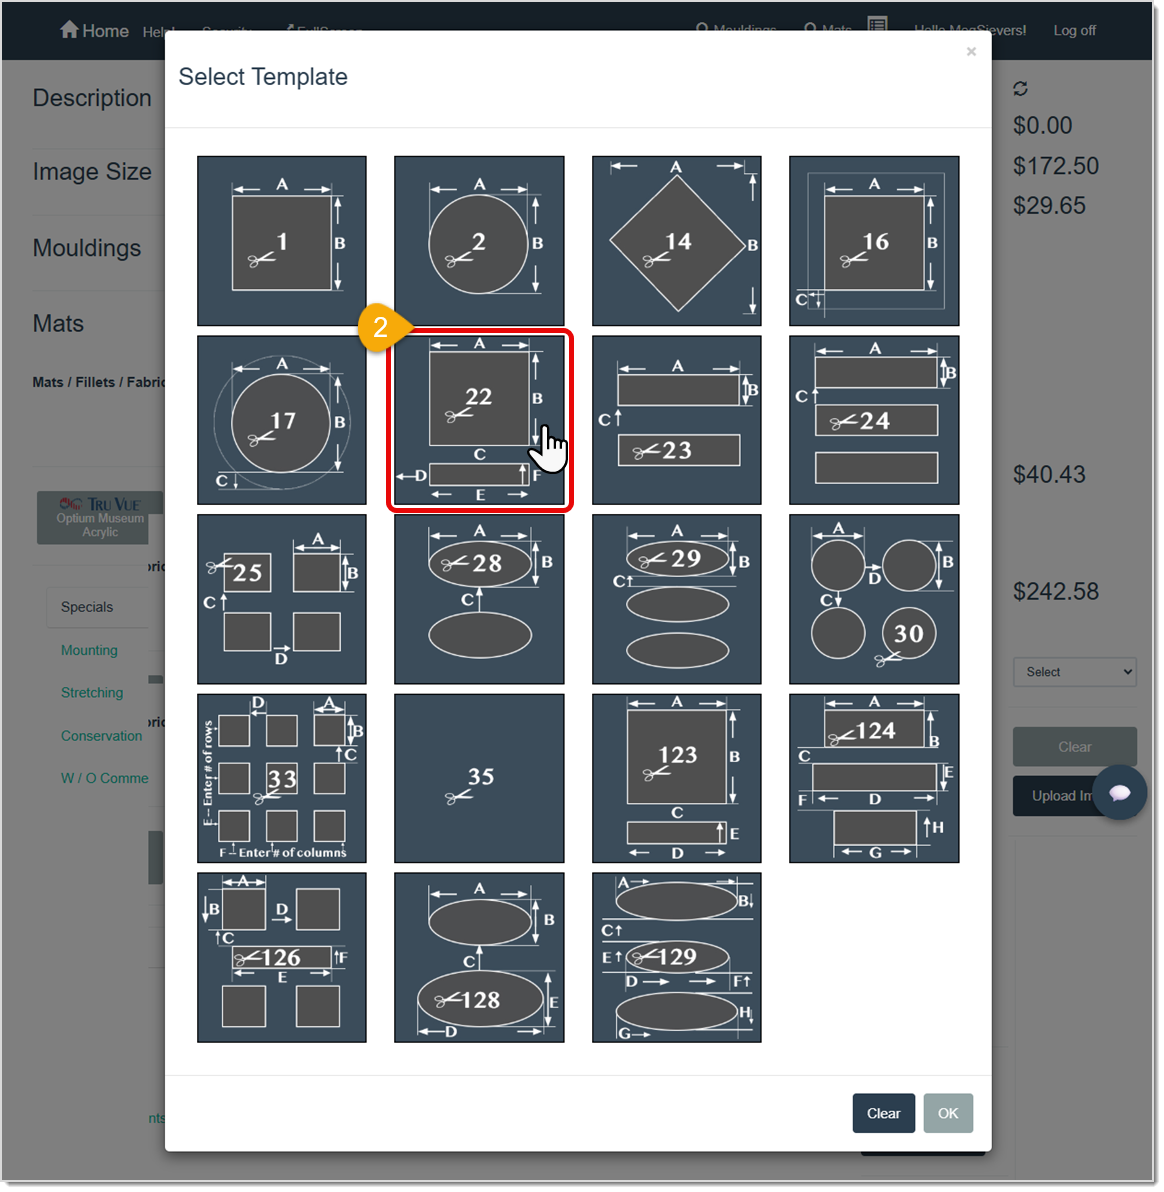
- Click on a template style to select it and the Select Template Measurements window will open.

- Enter the required measurements for your selected template and click the OK button. A comment is added for the Mat indicating that a Mat, and which Mat, was selected for the project.
Related Topics
Working With Vendors
Working With Work Orders
Store Configuration - Settings
Working With Mat Cutters
Frequently Asked Questions
Q: How do I search by color instead of item number?
A: Simply type any color name or partial color description (e.g., “blue”) in the Mat Search field. The system will display all results Matching “blue.”
Q: I have a question, but I can't find my answer here, how do I get more assistance?
A: You can ask any question at the link below, once received one of our technicians will be in touch! If you need immediate assistance, the LifeSaver Software team is available Monday through Friday, from 9:00am to 6:00pm Eastern time. Feel free to contact our support team at: 1-800-381-0600, extension 2. Or you can email us at support@lifesaversoft.com and we will respond within 24-hours.
 August 26, 2025
Is this page helpful?
×Help us improve our articles