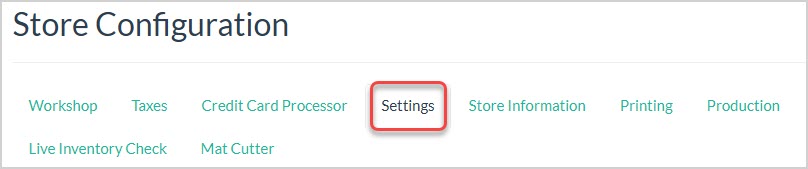
The primary system configuration area for LifeSaver Software is the Settings tab on your Store Configuration page. In this article, you will learn how to configure the settings on this tab the way you need. Read on to learn what settings are there for you.

To get to this area, click the Store Configuration button on the Home page. On the Store Configuration page, click the Settings tab.
Work Order Default Settings
The top-most settings area of the Settings tab contains configuration options for how you want your Work Orders to function.
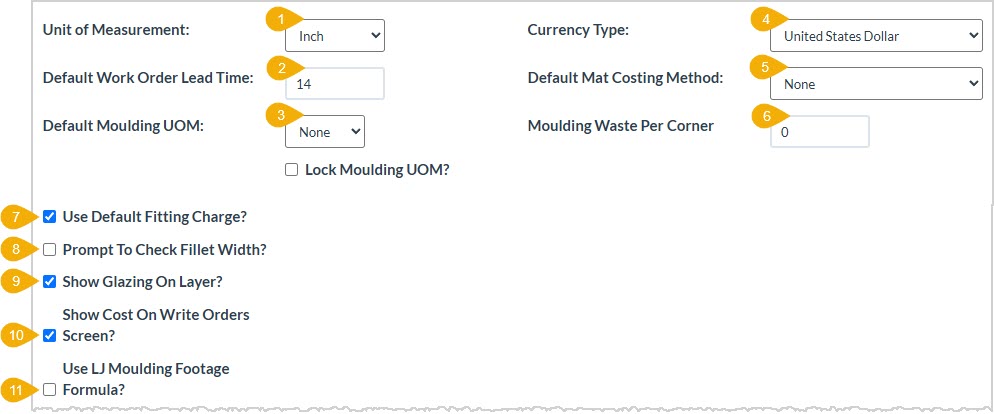
- Unit of Measurement – You can set your default unit of measurement for frame setup to be either Inch (default) or Millimeter.
- Default Work Order Lead Time – Enter the Number of Days lead time you want to complete for your work orders. The default is 14 days. Your entry here impacts how LifeSaver Software calculates your workshop schedule.
- Default Moulding Unit of Measure – You can set your default unit of measurement for moulding setup to be either Join, Chop, Length, or None (default), depending on how your moulding vendors most often send you stock. Please note, your default here will override the UOM setting in the individual vendor’s markup setting. You can use a check box to Lock Moulding Unit of Measure to your selection, if you will always use the same one.
- Currency Type – By default this is the United States Dollar, but if you’re in another country you can choose your currency from the list if the LifeSaver team hasn’t already done so.
- Default Mat Costing Method - You can choose how the system will automatically calculate your costs for mats in work orders from either None, Square Inch (only the mat material square inches), United Inch (width in inches plus height in inches: this costing method will be a multiple of the UI), or per mat Sheet.
- Moulding Waste Per Corner - Enter in the number of inches wasted per corner. The program will multiply the number entered times 4 corners and add the total inches to the amount of moulding footage needed for the workorder. (Optional)
- Use Default Fitting Charge – Check this box if you want to just use your Default Fitting Charge on each job. Default fitting charges are set up in Home > Services (Specials) > Fitting button.
- Prompt to Check Fillet Width – If you feel you need it, you can check this box to have the system pop up a reminder to check the width when working on a fillet.
- Show Glazing on Layer – Mouldings and mats are added to work orders from the outermost to innermost layer. Check this box if you want to add a Glazing on Layer option to the moulding drop-lists on a work order. Doing so allows you to indicate on which moulding layer the glazing should be placed.
- Show Cost on Write Orders Screen – If you want to see what job components are costing you when writing a work order so you can better gauge any discounts, you can check this box and the costs will display for you.
- Use Larson-Juhl Moulding Footage Formula – If you want the system to calculate moulding footage for L-shaped joints using the following formula, check this box: (Length of one side + Length of the other side) x 2 + (Width of moulding x 8) + (Waste allowance) = Total inches / 12 = Total feet.
Border and Mat Settings
The next area of the Settings tab contains default configuration options for your borders and mats. You can overwrite these measurements as needed on a work order.

- Border Width – You can set your default border width for each side of the frame by entering the number of inches you want in each field. On work orders, you can add a Border Width manually before or after adding a Mat, otherwise, the system will use whatever you enter here.
- Reveal Second Mat – Enter the default amount of reveal you want for the second mat. Enter fractional inches as shown above, or millimeters as whole numbers, depending on your default unit of measurement.
- Reveal Third+ Mat – Enter the default amount of reveal you want for the third and each successive mat. Enter fractional inches as shown above, or millimeters as whole numbers, depending on your default unit of measurement.
- Use Add Reveal – If checked when you write a WO with multiple mats it will add the additional mat reveals to the mat width you entered. With this unchecked, the program assumes you are entering the total mat width for all mats so then on the WO it will subtract the reveals to get to the top mat width. By default this is the United States Dollar, but if you’re in another country you can set your currency if the LifeSaver team hasn’t already done so.
Write Order and Invoice Settings
The next area of the Settings tab contains configuration options for your Write Order and Invoice defaults.

- Require Manager Override – For an override discount when writing an order, you can check this box to require a manager to authorize the override.
- Require Customer – Check this box to require a customer on each of your orders.
- Require Art Type – Check this box to require the selection of an Art Type on each of your orders.
- Require Art Condition – Check this box to require the selection of the Art Condition on each of your orders.
- Require Promotion – Check this box to require a Promotion on each of your orders.
- Ticket Screen: Width X Height – Check this box to change the default order of art measurement to change from Height x Width to Width x Height.
- Enable FrameVue™ – Check this box if you have installed and set up FrameVue™ and want to use it for previews.
- Allow Manual Entry Line Items on an Invoice – If you want your employees to be able to manually create line items on orders, check this box. Manually adding a line item to an invoice creates it in your inventory.
- Require All Work Orders on an Invoice to be Delivered Together – Check this box to have the system require all work orders on the same invoice to be Assembled before any of them can be moved to a Delivered status.
- Hide the Discount Option When You Write a Work Order – If you don’t want the discount option to display when writing orders, check this box.
Payment and Inventory Settings
The next area of the Settings tab contains configuration options for your payments and inventory preferences.

- External Payment Process – If you don’t use LifeSaver Software Payments integrated card processing, you can check this box to remove the Payments button from your system Home page. Please note, checking this box will remove the ability to pay off an order for reporting purposes.
- External Gift Card Payment Process – Check this box if you don’t use integrated gift cards through our credit card processing.
- Show TruVue™ Glazing Upsell Popup – Check this box to prompt your sales staff to ask the customer if they would like to upgrade to the next level of TruVue glazing. The pop-up also provides the cost of the upgrade so that it can be easily shared with the customer.
- Show Charge Account Payment Option on the Payment Screen – Check this box to display the Charge Account Payment option during payment for your orders.
- Show Frame Club Payment Option on the Payment Screen – Check this box to display the Frame Club Payment option during payment for your orders.
- Show Groupon Payment Option on the Payment Screen – Check this box to display the Groupon Payment option during payment for your orders.
- Show Write Off Payment Option on the Payment Screen – Check this box to display the Write Off Payment option during payment for your orders.
- Order Screen: Require Payment Before Delivery – Check this box to not allow delivery before payment in full on the Orders page. Please note, this setting does not affect how the order displays on the Production screen.
- Order Screen: Number of Days to Start Search from Current Date – Enter the number of days of history to show on the Order page. The number you enter here determines the default From Date used to search your order history on the Orders page. For example, if you enter 7 here, and today is April 7, the Order page will show orders placed between April 1 and April 7.
- Use New Production Screen – This setting will soon be deprecated as we now have all stores using the new Production screen.
- Include Inventory Items on Product Screen – Check this box if you want the Production Status page to display inventory items.
- Inventory Items Not Automatically Marked as Delivered – Check this box if you want to manually mark inventory items as Delivered.
- Decrement Inventory – Check this box if you want to track your inventory quantities and have them reduce as they are sold.
- Warn When Inventory Falls Below Threshold – Check this box if you want the system to warn you whenever an inventory item falls below the quantity you select in the item’s Inventory listing.
Work Order Variables Settings
The next area of the Settings tab contains configuration options for your work order variables.

- Additional Amount Per Foot – Enter the dollar amount you want to charge in addition to your cost for each foot of moulding. Enter an additional flat fee to charge per foot of moulding on a work order. You might choose to do this instead of assigning markups to your moulding costs.
- Additional Amount Per Mounting – Enter an additional flat fee to charge per mounting, such as acid-free, on a work order. You might choose to do this instead of assigning markups to your mounting costs. Mountings are managed as part of your services (specials).
- Additional Amount Per Glazing – Enter an additional flat fee to charge per glazing on a work order. You might choose to do this instead of assigning markups to your glazing costs.
- Additional Amount Per Mat – Enter an additional flat fee to charge per mat on a work order. You might choose to do this instead of assigning markups to your mat costs.
- Additional Mat Charge Per Work Order – Enter the dollar amount you want to charge if mats are included in a work order, regardless the number of mats used.
- Minimum Mat Price Is X Times Cost – Enter the X value for: Mat Price = X times Cost. For example, if your Mat Cost for a mat is $12 and you enter a Minimum value for X of 2, the resulting Mat Price would be a minimum of $24.
- Labor as a Percentage of Materials – Enter a percentage here to calculate the fitting fee by percentage of materials in the work order. The default value of “0” will calculate the fitting fee by “times markup” on the work order based on your Fitting settings (completed in the steps above).
- Moulding Minimum Footage – For any work order, enter the minimum footage of moulding you would have the system use if actual footage is less than that amount.
- Additional Fixed Amount – Enter the dollar amount you want to charge as a miscellaneous fee for each order.
- Create New Custom Payment Type – You can click this button to open the Create Custom Payment Type window. In the window, you can enter the Name of a payment type you want to have as an option when taking payment on an order and click the Create button to add it.
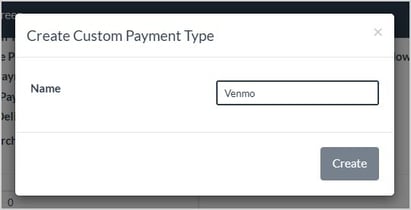
Custom payment types you create will appear below this button, and you have the option of clicking the Deactivate button to make the payment type inactive (it will remain on the page and will have an Activate button if deactivated).

- Save – Be sure to click the Save button if there are any changes you’ve made so they are set in the system for you.
Related Topics
Store Configuration - Taxes
Store Configuration - Store Information
Store Configuration - Production
Working with FrameVue Devices
Working with Mats
Working with Mouldings
Writing Work Orders
Frequently Asked Questions
Q: I have a question, but I can't find my answer here, how do I get more assistance?
A: You can ask any question at the link below, once received one of our technicians will be in touch! If you need immediate assistance, the LifeSaver Software team is available Monday through Friday, from 9:00am to 6:00pm Eastern time. Feel free to contact our support team at: 1-800-381-0600, extension 2. Or you can email us at support@lifesaversoft.com and we will respond within 24-hours.
 October 13, 2025
Is this page helpful?
×Help us improve our articles